


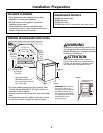
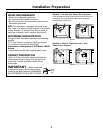
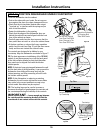
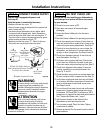

PREPARE HOT WATER LINE
• The line may enter from either side, rear or floor
within the shaded area shown in Figure F.
• The line may pass through the same hole as the
electrical cable and drain hose. Or, cut an additional
1-1/2" dia. hole to accommodate the water line.
If power cord with plug is used, water line must not
pass through power cord hole.
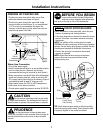
Water Line Connection
• Turn off the water supply.
• Install a hand shut-off valve in an accessible location,
such as under the sink. (Optional, but strongly
recommended and may be required by local codes.)
• Water connection is on the left side of the dishwasher.
Install the hot water inlet line, using no less than 3/8"
O.D. copper tubing. Route the line as shown in Figure F
and extend forward at least 19" from rear wall.
• Adjust water heater for 120°F to 150°F temperature.
• Flush water line to clean out debris.
• The hot water supply line pressure must be 20-120 PSI.
Installation Instructions
7
Cabinet Face
Shut-off
Valve
2" From Floor
19" From Wall
2"
From
Cabinet
1-1/2" Dia.
Hole
Hot
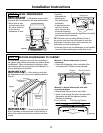
CAUTION
Do not remove wood base until you are ready
to install the dishwasher. The dishwasher will tip over
when the door is opened if the wood base is removed.
PRUDENCE
Il ne faut pas enlever la base de bois avant
d’être prêt à installer le lave-vaisselle. Quand la base de
bois est enlevée et la porte ouverte, le lave-vaisselle
bascule.
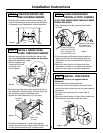
BEFORE YOU BEGIN
Locate and set aside the two Phillips head
mounting screws wrapped with yellow tape
and stuck to the top or side of the dishwasher.
Figure F
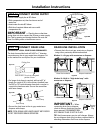
CHECK DOOR BALANCE
• With dishwasher on the wood skid, check the door
balance by opening and closing the door.
• If the door drops when released, increase the spring
tension. If the door rises when released, decrease
the tension.
NOTE: The addition of the custom panel on model
ZBD6890 will require exchange of the factory installed
springs. Use the heavy-duty springs provided. See the
custom panel template for additional instructions.
• Position the spring for increased or decreased
tension as required.
NOTE: Adjust both balance springs to the same
amount of tension to prevent excessive door
twisting during use.
TIP: If door does not open easily or falls too quickly,
check the spring cable routing. Check that the cable
is properly aligned on the pulley (as shown).
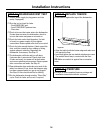
STEP 1
Correct Spring
Cable Routing
Increase
Tension
Decrease
Tension
Pulley
Shoulder
Use This
Mounting
Hole
Figure G