


10
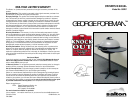
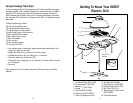
How To Use the George Foreman
Electric Grill
IMPORTANT: Before operating this Grill outdoors, see “Special
Considerations for Outdoor Use” in the “IMPORTANT SAFEGUARDS” and
"Additional Important Safeguards" sections of this manual.
1. Turn the Temperature Control Probe to the OFF position. Attach
securely into the Probe Receptacle. Make sure the Probe is pushed
in as far as possible to assure proper connection.
2. To preheat: Use the Handle to close the Lid and plug the cord into a
120V AC grounded outlet. Turn the dial on the Temperature Control
Probe to the desired temperature setting. The light on the
Temperature Control Probe will illuminate and the Grilling Plate will
begin heating. Allow the unit to preheat for at least 15 minutes
before use.
3. Carefully remove the Lid and place food onto the Grill. Cover for most
foods. Cook until done, turning at least once halfway through cooking
time for most foods. Adjust temperature as needed.
4. You can control the moisture of foods to some extent by opening or
closing the Lid Vent. Turning the Lid Handle/Vent counter-clockwise
will open the vent for drier cooking. Turning the Lid Handle/Vent
clockwise will reduce the vent opening and retain moisture within
the food.
CAUTION: Condensation may collect on the inside of the Lid when
cooking. Use caution when removing lid.
5. The light on the Temperature Control Probe will cycle on and off as
the thermostat maintains the proper temperature. This is normal
operation.
NOTE: The Temperature Control Probe may be turned to setting 1 to
keep foods warm for a short period of time.
6. When the food is cooked, remove with spatula or a plastic or wooden
utensil. Be sure to always use either plastic or wooden utensils so as
not to scratch the non-stick surface. Never use metal tongs, forks or
knives as these can damage the coating on the cooking plates.
CAUTION: Do not leave any utensils on the Grill Plate surface while
it is plugged in or hot.
7. When finished cooking, turn the Temperature Control Probe to the
OFF position. The indicator light will go off. Unplug and allow to cool
before disassembling and cleaning.
8. When cool, the Drip Cup may be removed and emptied. Be sure the
liquid has cooled before removing Drip Cup.
7
Roasting/Baking Chart
1. Preheat the Electric Grill at the desired temperature setting for a mini-
mum of 15 minutes.
2. Place meat or poultry in a baking container and add 1 cup water or
broth.
3. Cover baking container with aluminum foil or glass cover. Using oven
mitts, carefully place baking container on the Grill, cover Grill with Lid
to keep in moisture.
NOTE: A cooking bag may be used inside a baking container. Follow man-
ufacturer's instructions. Food wrapped in aluminum foil may be
placed directly on Grill.
INTERNAL
FOOD AMT. TEMP TIME TEMP
Beef Roast 2-4 lbs. 5 1 1/2-2 1/2 hrs Medium to Well
160˚-170˚F (71˚-77˚C)
Chicken, whole 2-1/2-4 lbs. 5 1 1/4-2 hrs Well 180˚˚F (82˚C)
fryer
Fresh Ham 5-7 lbs. 5 1 1/2-2 1/2 hrs Well 180˚˚F (82˚C)
Pork Roast 2-4 lbs. 5 1 1/2-3 hrs Medium to Well
160˚-170˚F (71˚-77˚C)
Baking Potato, 1-10 5 1 1/4-1 1/2 hrs Until done, turn half way
(wrap in foil) through cooking time
PLEASE NOTE: The USDA recommends that meats such as beef, pork
and lamb should be cooked to an internal temperature of at least 145˚F
and pork should be cooked to an internal temperature of at least 160˚F to
be sure any harmful bacteria has been killed. When reheating
meats/poultry products, they should also be cooked to an internal tem-
perature of 165˚F.