


How to use:
This product is for household use only.
GETTING STARTED
• Removeallpackingmaterialandanystickers.
• Removeandsaveliterature.
• WashremovablepartsasinstructedinCAREANDCLEANINGsectionofthis
manual.
• Wipegrillplatesandgriddleplatewithadampclothorspongetoremoveany
dust. Wipe dry with a soft cloth or paper towels.
• Selectlocationwhereunitistobeused,leavingenoughspacebetweenback
of unit and wall to allow heat to flow without damage to cabinets and walls.
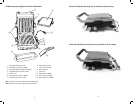
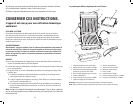
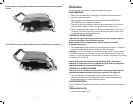
ATTACHING THE GRILL PLATES
Important: This appliance should always be used with 2 grill plates securely
attached.
Caution: Attach all grill plates when the appliance is cool.
Basic Grill Plates
1. Securely attach the top and bottom grill plates of the appliance using the
release handles on each side of the plates.
Note: When using these grill plates, use the bar at the rear of the grill to lift the
back of the bottom grill plate to have the drippings run into the drip tray (see
plate position A on page 4).
Important: This position should only be used when grilling.
Important: When attaching the grill plates, be sure they are securely attached
using the release handles on each side of the plates.
Attaching the bake pan
Important: When using this plate, make sure the appliance is in the completely
horizontal position (see plate position B on page 4).
1. If using the baking pan, securely attach the top grilling plate and baking pan
using the release handles on each side of the plates.
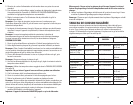
DRIP TRAY
Place the drip tray under the front sloped section of the bottom plate on the grill.
PREHEATING THE GRILL
1. Close cover on grill.
2. Unwind cord and plug into standard electrical outlet.
3. Set variable temperature control dial to desired grill setting to begin
preheating.SeeSUGGESTEDGRILLINGCHARTforrecommendedtemperature
settings.
4. Set timer between 7 – 10 minutes to preheat at desired temperature.
Note: When setting timer, always turn the dial past 10 and then turn back or
forward to desired setting.
4. The power light (red) comes on to indicate that the elements are heating.
When the appliance is preheated the ready light (green) will turn on.
Note: When set temperature is reach, both the red power light and green ready
light will illuminate. When the timer elapses to zero (0), both lights will go out.
GRILLING
1. Using a pot holder, carefully open the preheated grill.
2. Before first use, lightly oil grill plates, if desired.
Note: Aerosol cooking spray should not be used on nonstick surface. Chemicals
that allow spray to come out of can build up on surface of grill plates and reduce
their efficiency.
3. Carefully place foods to be cooked on lower grilling plate. Close lid.
Note: Do not overload grill.
4. Once food is placed on grill, set timer to desired cooking time.
Note: UsesuggestedcookingtimesfoundintheGRILLINGCHARTonpage7.
Important: Do not leave the appliance unattended during use.
5. After selected time, the food should be done.
6. Using a pot holder, carefully open the grill cover.
7. Remove cooked food using plastic spatula provided.
Note: Always use heatproof plastic, nylon or wood utensils to avoid scratching
nonsticksurfaceofgrillplates.Neverusemetalskewers,tongs,forksorknives.
8. When finished cooking, turn the dial to the LOW setting and unplug the
appliance.
Important: Heat continues to be ON until grill is unplugged.
Warning: Do not remove grill plates while grill is still hot! Allow grill to cool
completely before removing or changing plates.
9. Allow drip tray to cool before removing it from under grill. Wash and dry drip
tray after each use.
Note: Be sure the liquid in drip tray has cooled before attempting to move it.
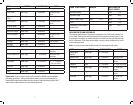
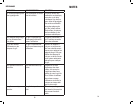
SUGGESTED GRILLING CHART
The following are meant to be used as a guideline only. The times reflect a full
grill of food. Cooking time will depend upon thickness and cut being used. Use a
cooking thermometer as a test for doneness. If the food needs longer cooking,
check periodically to avoid overcooking the food.
6
5