


8
User Maintenance Instructions
CAUTION: To avoid accidental burns, allow your Grilling Machine to
cool thoroughly before cleaning.
1. Before cleaning, unplug the appliance from the wall outlet and allow
to cool.
CAUTION: To avoid any sparks at the outlet while disconnecting plug, make sure
the power is off (Timer and Temperature Displays show dashes) before discon-
necting the plug from the outlet.
2. Inside cleaning: Place the Drip Tray under the front of the Grilling
Machine. Using the specially designed Spatula, scrape off any
excess fat and food particles. Wipe the plates with absorbent paper
towel or a sponge. Run off will drip into the Drip Tray.
3. Empty the Drip Tray and wash with warm soapy water. The Grilling
Plates may be removed from the appliance by pulling out on the
Grilling Plate Release Handles. Wash in warm, soapy water and dry
thoroughly. Reinstall the Grilling Plates, making sure they are secure-
ly attached to the appliance. The removable Grilling Plates are also
dishwasher safe.
4. Stubborn build-up: Use a non-metallic scrubbing pad to clean the
plates.
5. Outside cleaning: Wipe with a warm, wet sponge and dry with a soft,
dry cloth.
6. Do not use steel wool, scouring pads, or abrasive cleaners on any
part of the appliance.
7. DO NOT IMMERSE THE BODY OF THE APPLIANCE IN WATER OR
OTHER LIQUID.
8. Any servicing requiring disassembly other than the above cleaning
must be performed by a qualified electrician.
9. Make sure to hold the top cover (Lid) by hand while cleaning to pre-
vent accidental closing and injury.
5
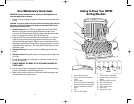
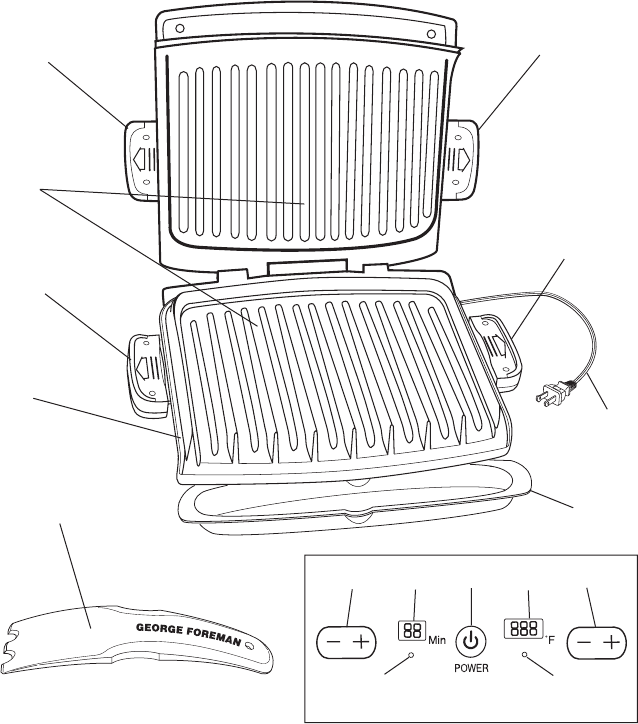
Getting To Know Your GRP99
Grilling Machine
R
E
L
E
A
S
E
R
E
LEA
SE
R
E
L
E
A
S
E
RE
L
E
A
SE
1
3
6
7
2
4
5
8
10
9
11
13
12
14
1. Grilling Machine Body
2. Grilling Plate Release Handles,
Lower
3. Grilling Plates
Upper Grilling Plate (P/N 22543U)
Lower Grilling Plate (P/N 22543L)
4. Grilling Plate Release Handles,
Upper
5. Cord
6. Drip Tray (P/N 22544)
7. Plastic Spatula (P/N 22545)
8. Variable Temperature Control
Button
9. Temperature Display (LED)
10. Power On/Off Button
11. Timer Display (LED)
12. Timer Control Button
13. Timer Light
14. Temperature Light
Controls
4
2
GR_GRP99_IB_29-4-04 5/3/04 9:20 PM Page 9