


7
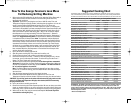
Suggested Cooking Chart
The following times are meant to be used as guidelines only. Times will vary due to the cut or thick-
ness of the meat being cooked. To be sure that the food is truly done, use a cooking thermometer. If
the food does need more time to cook, reset the timer and check periodically so you do not overcook.
When cooking the following items, we recommend setting your Grilling Machine to 300˚F:
Medium Rare 145˚F* Medium 160˚F* Well 170˚F*
Salmon Filet, 1" thick, 4 oz each 7-8 min. 9-10 min.
Salmon Steak, 1" thick, 10 oz each 8-9 min. 11-12 min.
Sword Fish, 1" thick, 6 oz each 8-9 min. 10-11 min.
Tuna Steak, 1" thick, 6 oz each 6-7 min. 8-9 min.
White Fish, 1/2" thick, 6 oz each 2-3 min. 4-5 min.
Turkey Burger, 3/4" thick, 4 oz each 8-10 min.
Turkey Burger, 1" thick, 8 oz each 11-13 min.
Frozen Turkey Burgers, 3/4" thick, 4 oz each 11-13 min.
Frozen Turkey Burgers, 1" thick, 8 oz each 14-16 min.
Sea Scallops, 1" thick, 1 oz each 3-4 min. 4-5 min.
Shrimp, Split Shell, med. size, 1/2 lb. 2-3 min.
When cooking the following items, we recommend setting your Grilling Machine to 350˚F:
Center Cut Pork Chops, 1/2" thick, 6 oz each 8-9 min. 10-11 min.
Pork Tenderloin, 1/2" thick, 2 oz each 3 min. 5-6 min.
Hamburger, 3/4" thick, 4 oz each 7-8 min. 9-10 min.
Hamburger, 1" thick, 8 oz each 9-10 min. 11-12 min.
Frozen Hamburger, 3/4" thick, 4 oz each 9-10 min. 11-12 min.
Frozen Hamburger, 1" thick, 8 oz each 15-16 min. 17-18 min.
Chicken Breast (boneless/skinless)1
1
/
2
" thick, 6-8 oz each 9-10 min.
Frozen Chicken Breast (boneless/skinless) 1
1
/
2
" thick, 6-8 oz each 12-13 min.
Link Sausage 4-5 min. 5-6 min.
Sliced Sausage (1/2" thick) 4-5 min. 5-6 min.
Brats 5-6 min. 6-7 min.
Hot Dogs 5-6 min.
Ham Steak, 3/4" thick, 4 oz each 4-5 min. 5-6 min.
When cooking the following items, we recommend setting your Grilling Machine to 400˚F:
Fajita Beef (
1
/
2
" thick slices) 1-2 min. 2-2
1
/
2
min. 2
1
/
2
-3min.
T-Bone Steak, 3/4" thick, 12 oz each 3-4 min. 4-5 min. 5-6 min.
Frozen T-Bone, 3/4" thick, 16 oz each 8-9 min. 11-12 min. 13-14 min.
NY/KC Strip Steak, 3/4" thick, 8 oz each 7-8 min. 8-9 min. 9-10 min.
Frozen NY/KC Strip Steak, 3/4" thick, 8 oz each 7-8 min. 8-9 min. 9-10 min.
Ribeye Steak, 3/4" thick, 12 oz each 5-6 min. 6
1
/
2
-7
1
/
2
min. 8-9 min.
Frozen Ribeye Steak, 3/4" thick, 10 oz each 9-10
1
/
2
min. 10-11
1
/
2
min. 11-12
1
/
2
min.
Onions and Peppers (brush with olive oil) 7-8 min. 9-10 min.
PLEASE NOTE: The USDA recommends that meats such as beef and lamb, etc. should be cooked to
an internal temperature of 145˚F. Pork should be cooked to an internal temperature of 160˚F and
poultry products should be cooked to an internal temperature of 170˚F - 180˚F to be sure any harmful
bacteria has been killed. When reheating meat/poultry products, they should also be cooked to an
internal temperature of 165˚F.
* Internal Food Temperatures
6
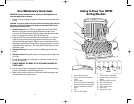
How To Use George Foreman’s Lean Mean
Fat Reducing Grilling Machine
1. Before using the Grilling Machine for the first time, wipe the Grilling Plates with a
damp cloth to remove all dust.and make sure both Grilling Plates are firmly
attached to the appliance.
2. To preheat: Close the Lid and plug the cord into a 120V AC outlet. Time and
Temperature Displays will show dashes, indicating that the appliance is in the off
mode. Press the Power On/Off Button to turn the unit on. The Timer and
Temperature Light will illuminate. The Timer Display will show "5", indicating the
start of the 5 minute (300°F) pre-heat countdown and the Temperature Display will
show a flashing "300". Adjusting the Variable Temperature Control allows you to
cook your food at a specific heat setting, 300˚ - 425˚F, in 25˚ increments. Adjust
the temperature to your desired setting. Press the Temperature "+" Button to
increase the temperature. To decrease the temperature press the Temperature "-"
Button. See Suggested Cooking Chart for specific details. When the countdown
is complete the unit will beep 4 times. Note: If temperature reaches displayed
temperature before 5 minutes the temperature display will stop flashing and the
unit will beep 4 times. Unless the time is reset, the unit will continue its 5 minute
countdown and will beep 4 times once it reaches 5 minutes. The Timer Display
will show "on" as a reminder that the power is still on and the Timer Light will go
out. If the Temperature Display is still flashing the set temperature has not yet
been reached. When the set temperature is reached the unit will beep 4 times
and the display will stop flashing.
3. Use a pot holder to carefully open the Lid.
4. Slide the grease catching Drip Tray under the front of the unit.
5. Carefully place the items to be cooked on the bottom grilling plate.
6. Close the Lid and press the Timer "+" Button to raise the grilling time in 1 minute
increments, up to a maximum of 20 minutes. To reduce time, press the Timer "-"
Button. The Timer Display will show the set time.
7. Allow the food to cook for the desired time. Do not leave appliance unattended
during use! During grilling, the Timer Display will begin counting down. When the
set time has elapsed the unit will beep 4 times. Reminder: The heat continues to
be "on" until the appliance is turned off.
Note: The Grilling Machine will automatically shut-off one hour after you have
turned it on. To continue cooking, press the ON/OFF Button and reset the temper-
ature and time.
8. After the desired amount of time, the food should be done.
9. Press the Power On/Off Button to turn the appliance off. The Time and
Temperature Displays will show dashes. Disconnect the plug from the wall outlet.
CAUTION: To avoid any sparks at the outlet while disconnecting plug, make sure the
power is off (Timer and Temperature Displays show dashes) before disconnecting
the plug from the outlet.
10. Use a pot holder to carefully open the Lid.
11. Remove the food using the Plastic Spatula provided. Be sure to always use either
plastic or wooden utensils so as not to scratch the non-stick surface. Never use
metal tongs, forks or knives as these can damage the coating on the grilling plates.
12. When cool, the Drip Tray may be removed and emptied. Be sure the liquid has
cooled before removing Drip Tray.
GR_GRP99_IB_29-4-04 5/3/04 9:20 PM Page 11