


9
Proximity Hood
®
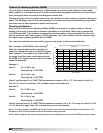
Note: The installation of the hoods shall be in accordance with NFPA 96 (latest edition), Standard for
Ventilation Control and Fire Protection of Commercial Cooking Operations.
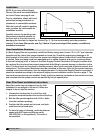
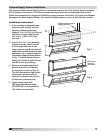
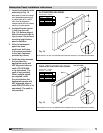
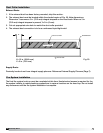
Fig. 14 shows the locations where the
hood must be fastened. If a Back Supply
Plenum is part of the hood system,
please see pages 8-9, Back Supply
Plenum/Hood Installation.
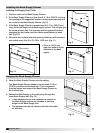
To hang the hood:
1) Locate the studs in the wall.
2) Drill 1/2 in. (13 mm) diameter holes in
the hood mouting flange. Be sure to
align to wall studs.
3) Lift hood into a level position and
lag bolt hood to wall (fasteners by
others).
4) Bolt 1/2 in. (13 mm) threaded rod into
the hanger brackets.
5) Fasten threaded rod to ceiling
supports then level the hood.
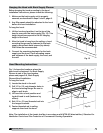
Hood Mounting Instructions
Hanging the Hood with Back Supply Plenum
Before hanging the hood according to the hood
installation instructions, please check the following:
1. Make sure the back supply unit is properly
secured, as described in steps 5 and 6, page 8.
2. Any filler panels should be attached to the hood
before the hood installation.
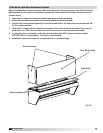
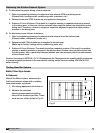
To hang the hood:
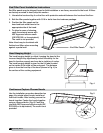
1. Lift the hood and position it so the top of the
hood is even with the back supply (Fig. 13). This
height should correspond to the UL hanging
height of the hood.
2. After the hood is hung from the ceiling, a hood
mounting flange may be fastened to the back
supply using sheet metal screws (by others).
Pilot holes are recommended.
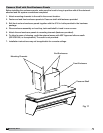
3. Connect the remaining ductwork for the back
supply and the hood. Caulk all mating seams
and surfaces of the back supply, the hood, and
the wall.
Hanger Brackets
Mounting Flange
Fig. 14
Fig. 13