


STANDARD FEATURES
Three options are available on this equipment; these options are available independently of each other. The features are described below:
Pre-infusion: This option enables the brewer to wet the grounds and then have a dwell period before the brew cycle is completed. This option
causes the brew valve to open for a period of time, close for an equal period of time and then open again for completion of the brew. The preset
periods are, respectively, 15, 30 and 45 seconds for the small, medium and large settings. After this no-dispense period, the valve re-opens to
complete the remaining 82% of the cycle.
Low Temp, No Brew: This option inhibits the initiation of a brew cycle in the event that water temperature in the tank is more than 5°F lower than
the setpoint. In the event that the temperature is outside of the acceptable range, the WATER HOT light will be off. A brew cycle can only be
initiated when the light is on if this option is employed; attempts to initiate a brew when the light is off will be ignored by the controller.
Automatic Bypass: This option allows the brewer to provide for bypassing of the grounds only for the large portion size by signaling a solenoid
valve in the bypass circuit to open only when the large portion size is selected. The bypass amount is set by regulating the flow through the
standard manual bypass valve provided on all units (see Bypass Adjustment).
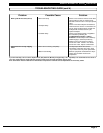
These features can be removed at no charge by ordering the following options:
ICB-400/300
Option 250 eliminates pre-infusion, lo-temp/no brew, leaves auto bypass only
Option 251 eliminates pre-infusion, leaves lo-temp/no brew, and auto bypass
Option 252 eliminates lo-temp/no brew, leaves pre-infusion and auto bypass
P430/330
Opt 253 eliminates low temp/no brew leaves pre-infusion and auto bypass
Opt 258 eliminates low temp/no brew and auto bypass leaves pre-infusion only
Opt 259 eliminates low temp/no brew and pre-infusion leaves auto bypass only
ADJUSTMENTS
WARNING: ELECTRICAL SHOCK HAZARD! DANGEROUS ELECTRIC VOLTAGES ARE PRESENT NEAR ADJUSTABLE COMPONENTS.
ONLY QUALIFIED SERVICE PERSONNEL SHOULD MAKE ADJUSTMENTS.
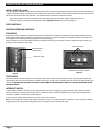
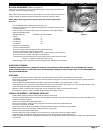
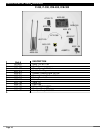
Components for adjustment of brew volume/brew timing and of temperature are located behind the small access panel located in the right-side
brewing alcove on ICB units and on the front panel on Columbia units. Adjustment for bypass is under the top panel. To access these
components:
• Turn off electric power to unit at the main breaker assigned to the unit (or disconnect the cord where applicable) when removing the
top panel.
• Remove the screws fastening the appropriate panel to the body.
• Remove the panel.
TEMPERATURE ADJUSTMENT
Brew water temperature can be adjusted by turning the knob on the main controller located behind the controller access panel. Temperature
adjustment range is from 175°F to 202°F. Adjustment for temperature should be made after measuring the temperature of the water dispensed
from the brew head by the following procedure.
1) Remove sprayhead from brewer and set aside.
2) Place a container under the outlet.
3) Press START and, using a thermometer, measure the temperature of the water being dispensed.
4) If a higher temperature is desired, rotate the TEMPERATURE ADJUSTMENT knob clockwise. If a lower temperature is desired, rotate the
temperature adjustment knob counterclockwise.
5) If water temperature setting has been increased, wait until heater has cycled and then follow steps 3 and 4 again. If water temperature
setting has been decreased, brew a large portion of water and repeat steps 3 and 4.
6) Continue this procedure until desired brew temperature is achieved.
7) Replace sprayhead.
BREW TIMING/BREW VOLUME ADJUSTMENT
Brew volume is adjusted by adjusting the timer values of the controller (refer to Temperature and Brew Timing Controls). The brewer timers
settings are preset at the factory to the following values:
Small brew (0.75 gal.) 120 sec.
Medium brew (1.25 gal.) 165 sec.
Large brew (1.75 gal.) 230 sec.
Before adjusting brew timing, brew a batch of water and measure the brew volume. Record this value.
To adjust brew timing:
• Remove controller access panel.
• If making timer adjustments on a twin brewer, slide the brewer selector switch to the appropriate position. On single brewers, the switch
should always be in the left position.
• Press the SELECT button momentarily; a LED will light up to indicate which timing selection is being displayed on the alphanumeric
display. The top LED corresponds to the small portion size, the middle LED corresponds to the medium size, and the lower LED
corresponds to the large setting. Note the timer value displayed. The new timing should be calculated by the following:
Desired Brew Time = Desired Brew Volume
Current Brew Volume
• After selecting the appropriate side and portion timer, adjust the timer value to the desired value by pressing the UP or DOWN buttons on
the controller. Hold the button down until the desired value is displayed; then press the SELECT button on the controller.
• Brew a batch of water and measure volume dispensed. Repeat procedure as necessary until desired volume is dispensed.
• Replace access panel.
AMERICAN METAL WARE
®
BREWERS
X Current Brew Time
Page 4