


PNEG-524 Roof Exhaust Fan 13
5. INSTALLATION
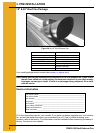
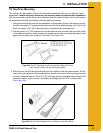
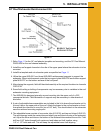
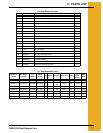
24" Roof Exhauster Reinforcement Kit
Figure 5J
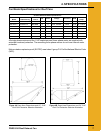
1. Refer Page 11 for the 24" roof adaptor template and mounting, and the 30° Roof Manual
PNEG-030 for the roof channel assembly.
2. Install the roof support channels in the ribs of the upper panel where the exhauster is to be
mounted.
3. Install the template and cut exhauster parts as specified on Page 11.
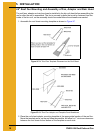
4. Utilize the upper MIS-6811 and lower MIS-6805 reinforcement supports to support the
exhauster. Mount reinforcement under the top support plate MIS-6706 and bottom support
plate MIS-6707 on the bottom surface of the roof panel.
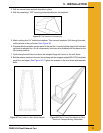
5. After placing the supports, field drill the attachment clip at the required locations in channels
CRP-4793.
6. Some field cutting or bolting of components may be necessary due to variables in the roof
exhauster mounting equipment.
7. The MIS-6804 is designed primarily around mounting into the upper roof of a GSI
commercial bin/silo. Field fabrication of supports may be necessary in other brands of
bins/silos.
8. A pair of adjustable brace assemblies are included in this kit to brace the exhauster unit to
the roof ribs on the upper side of the roof. Attach the brace to the roof exhauster unit and
then attach the other end to a roof rib (via a 5/16" bolt). This should attach to the exhauster
near the rainhood mounting angle point.
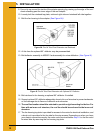
9. The adjustable brace consists of one center tube (LS-6615) and two end tubes (LS-6616).
The end tubes go inside the center tube and attach one end tube to the top of the extension
rail. Adjust the other end tube so the bottom of the flattened tube reaches the roof rib. Field
drill four 5/16" holes through both center and end tubes and bolt together using
1/4" x 1.1/2" bolts and nuts. This will keep the adjustable brace from slipping.