


Page 5SKU 4832 For technical questions, please call 1-800-444-3353.
Inserting Rollers
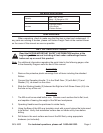
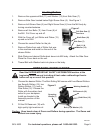
Remove the uppermost Bolt (11) and Washer (12) from Side Gear (7). 1.
Remove Side Gear located below Right Screw Gear (4). See Figure 1.2.
3. Remove Left Screw Gear (5) and Right Screw Gear (4) from the Mill body by
turning counterclockwise.
Remove all four Bolts (11) from Cover (6) of 4.
the Mill. Pull Cover up and off.
With the Cover off, pull Roller and Plates (13) 5.
up and out of Mill.
Choose the correct Roller for the job.6.
Remove Plates from end of Roller that was 7.
in the machine and install on the end of the
chosen Roller.
Slide Plates and desired Roller back down into Mill body. Attach the Side Gear. 8.
Place the Cover back on the unit.
Thread Bolt with Washer back into place on the body.9.
OPERATING INSTRUCTIONS
Read the ENTIRE IMPORTANT SAFETY INFORMATION section at the
beginning of this manual including all text under subheadings therein
before set up or use of this product.
1. Choose the desired Roller. The Mini-Rolling Mill comes with ve different Rollers:
two Smooth Rollers (15), two
Pattern Rollers (17), and a
Wire Roller (16). Choose the
Roller with the pattern best
suited to your workpiece.
Install as directed in the
Assembly section of this
manual.
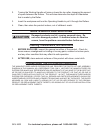
Fill the Oil Reservoir (18) with 2.
high quality light machine oil.
Caution. Keep hands clear of Gears and Rollers during operation. The Gears and
Rollers can cause injury.
Pull Side Gear (7)
from here
Shaft Gear (10)
Side Gear (7)
Bolt (11) &
Washer (12)
Figure 1
Working Handle (2)
Oil Reservoir (18)
Shaft Gear (12)
Bolt (11) & Washer (12)
Operating
Handle (1)
Figure 2
REV 09a