


SKU 66473 For technical questions, please call 1-800-444-3353. Page 2
Do not assemble or use when tired or when 8.
under the inuence of drugs or medication.
This product is not a toy. Do not allow 9.
children to play with or near this item.
Use for intended purpose(s) only.10.
Inspect before use; do not use if parts are 11.
loose or damaged.
Maintain product labels and nameplates. 12.
These carry important safety information.
If unreadable or missing, contact Harbor
Freight Tools for a replacement.
Foodborne Illness Safety
Before every use, thoroughly clean the 1.
appliance (see “Cleaning” section for
instructions) and wash your hands.
Follow Food and Drug Administration (FDA) 2.
food safety recommendations for cooking
and food handling (www.fda.gov). Also, refer
to the following safety information, taken from
FDA’s website:
Keep hot food hot (above 140° F) and a.
cold food cold (below 40° F). Do not let
perishable food sit out longer than 2 hours
(1 hour in temperatures above 90° F).
Read the ENTIRE IMPORTANT
SAFETY INFORMATION section
at the beginning of this document
including all text under subheadings
therein before set up or use of this
product.
Assembly
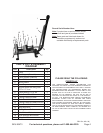
Position the Cutting Frame (10 or 12) against 1.
the End Support (2).
Insert the longer threaded end of each of 2.
the three Support Rods (7) into the openings
of the End Support (2) and Cutting Frame.
Secure in place using three Wing Nuts (15).
Insert the Cutting Frame Bolt (16) into the 3.
opening at the top of the End Support (2) and
Cutting Frame (10 or 12). Secure using one
of the Wing Nuts (19).
Place the Food Tray (6) in position.4.
Place Lever Support (3) onto the ends of the 5.
Support Rods (7) and x in place using Wing
Nuts (15).
Place appropriate sized Push Block (11 or 6.
13) on the Block Plate A (4) and x in place
by turning the Toggles.
Attach the Lever Assembly (1 and 8) to the 7.
Lever Support (3) using the Axle Bolt and Nut
(17). Tighten the Nut still allowing the Lever
to move freely.
Attach the Push Rods (9) to the Lever (1) 8.
using the Push Rod Bolt and Nut (18).
Tighten the Nut still allowing the Lever to
move freely.
Mounting the Tool
The tool is to be mounted to a wall or table.1.
The mounting surface must be at or level 2.
and sturdy enough to support the weight
of the tool, products placed on the tool and
forces exerted when using the tool.
Remove the Lever Support (3).3.
Hold the tool in position and mark the four 4.
mounting hole positions. Set the tool aside.
Check to be sure that you will not drill into 5.
any concealed wires, pipes, hoses or ducts
at the points marked. Drill holes at each of
the four marked points.
Reposition the tool and attach it using 6.
suitable fasteners (not included).
Changing Push Block
and Cutting Frame
This item is supplied with two sets of Cutting 1.
Frames and Push Blocks for making different
sized french fries.
To change size of french fry produced, 2.
change Push Blocks and Cutting Frames.
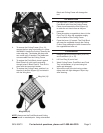
To remove Push Block (11 or 13), rotate the 3.
two swivel latches outward. The Block can be
lifted out.
REV 09c; 09j