


Page 5SKU 90262
Operation
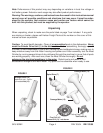
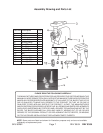
Refer to the Assembly Drawing on page 7 and FIGURES 1 and 2 on page 4.
Unplug the unit until you are completely prepared to grind.
Note: Situate the Grinder well away from the sink or any other water source. When the unit
is plugged in, if it contacts water, it can cause severe electrical shock causing injury or
death.
Assembly for Meat Grinding:
1. Gently drop the Spiral Drive (7) into the Mincing Body (6) with the shaft protruding through
the hole at the back.
2. Carefully fit the Star Cutter (8) on the end of the Spiral Drive (7) with its cutting edge facing
outwards. See FIGURE 2.
3. Place the Fine Grill (10), or Coarse Grill (11) on top of the Star Cutter (8) lining up the 2
tabs (See FIGURE 2) on the Grill with the notches threaded in the portion of the Mincing
Body (6).
4. Attach the #12 Nut to the body, taking care not to over-tighten it. The cutter must rotate
behind the grill, and should not bind.
5. Insert the Feeder Tube (4) into the Mincing Body (6).
6. Place the Mincing Body (6) into the Drive Unit (1) with the Feeder Tube (4) facing to the
right. Turn the Feeder Tube (4) upright for operation.
7. Add the Tray (3) to the top of the Feeder Tube (4).
Grinding
1. After cutting the meat so that the chunks are small enough to fit into the Feeder Tube (4),
you may plug in the unit.
2. Turn the Switch (2) to the “On” positon.
3. Drop a handful of meat into the Feeder Tube (4) and use the Pusher (13) to slowly push the
meat into the blade. Do not force the Pusher (13). Allow the blades to cut at their pace.
Continually add meat until you are finished. Shut off the unit and unplug from the outlet.
Assembly for sausage making:
Make sure the unit is unplugged.
1. If the unit is set up for meat grinding, remove the Nut (12) and then remove both the Grill and
the Star Cutter (8). They are not used for sausage making.
2. Gently drop the Spiral Drive (7) into the Mincing Body (#6) with the shaft protruding through
the hole at the back.
3. Position the wide end of the Sausage Maker (14) attachment so it threads into the
Mincing Body (6). Tightly thread the Nut (12) on the end of the Mincing Body (6).
See FIGURE 1.
REV 05/04 REV 03/05