


9
MAIN FUNCTIONS
HOW TO SEE THE SETPOINT
1. Push and immediately release the SET key:
the display will show the Set point value.
HOW TO CHANGE THE SETPOINT
1. Push the SET key for more than 2 seconds to change the
Set point value;
2. The value of the set point will be displayed and the
LED
starts blinking;
3. To change the Set value push the UP or DOWN arrows
within 10s.
4. To memorise the new set point value push the SET key
again or wait 10s.
HOW TO START A MANUAL DEFROST
Push the DEF key for more than 2 seconds
and a manual defrost will start.
HOW TO CHANGE A PARAMETER VALUE
To change the parameter’s value operate as follows:
1. Use “UP” or “DOWN” to change its value.
2. Press “SET” to store the new value and move to the
following parameter.
To exit: Press SET + UP or wait 15s without pressing a key.
NOTE: the set value is stored even when the procedure is
exited by waiting the time-out to expire.
THE HIDDEN MENU
The hidden menu Includes all the parameters of the instrument.
HOW TO ENTER THE HIDDEN MENU
1. Enter the Programming mode by
pressing the Set + DOWN key for 3s
(LED 1 and
start blinking).
2. When a parameter is displayed keep
pressed the Set + DOWN for more than 7s.
The Pr2 label will be displayed immediately
followed from the HY parameter.
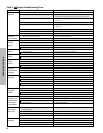
Label Characteristic Description
Menu/User
Level
Possible
Settings
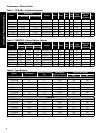
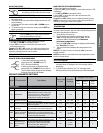
DEFAULT SETTINGS
Low
Temp.
Medium
Temp.
High
Temp.
REGULATION
SEt Set Point LS ~ US -10 34 38
Hy Dierential
(0,1 ÷ 25,5°C / 1÷255 °F) Intervention
dierential for set point. Compressor
Cut IN is Set Point + dierential (Hy).
Compressor Cut OUT is when the
temperature reaches the set point
Pr1 1~ 45 3 3 3
LS Minimum set point
(- 50°C÷SET/-58°F÷SET): Sets the minimum
value for the set point..
Pr2 -67 ~ SET -23 25 33
US Maximum set point
(SET÷110°C/ SET÷230°F). Set the maximum
value for set point.
Pr2 SET ~ 302F 37 40 45
Ot
Thermostat probe
calibration
(-12.0÷12.0°C; -120÷120°F) allows to adjust
possible oset of the thermostat probe
Pr2 -21~21 0 0 0
OdS
Outputs activation
delay at start up
(0÷255min) This function is enabled at
the initial start up of the instrument and
inhibits any output activation for the period
of time set in the parameter
Pr2
0 ~ 255
minutes
0 0 0
AC
Anti-short cycle
delay
(0÷50 min) minimum interval between the
compressor stop and the following restart
Pr2
0 ~ 50
minutes
4 4 4
COF
Compressor OFF
time with faulty
probe
(0÷255 min) time during which the
compressor is OFF in case of faulty
thermostat probe. With COF=0
compressor is always active
Pr2
0 ~ 255
minutes
6 6 6
NOW YOU ARE IN THE HIDDEN MENU.
3. Select the required parameter.
4. Press the “SET” key to display its value (Now only the LED
is blinking).
5. Use UP or DOWN to change its value.
6. Press “SET” to store the new value and move to the
following parameter.
To exit: Press SET + UP or wait 15s without pressing a key.
NOTE: the set value is stored even when the procedure is
exited by waiting the time-out to expire.
HOW TO SEE THE ALARM DURATION AND MAX MIN
TEMPERATURE
If the alarm LED is on, an alarm has taken place.
To see the kind of alarm, the max (min) reached temperature
and alarm duration do as follows:v
1. Push the Up or Down key.
2. On the display the following message is shown::
“HAL” for high temperature alarm (“LAL” for the
minimum allarm), followed by the Maximum
(minimum) temperature.
Then the “tiM” (tiMe) message is displayed, followed by
the “Duration” in h.mm.
3. Then the instrument displays the temperature once
again.
NOTE1: if an alarm is still occurring the “tim” shows the
partial duration.
NOTE2: the alarm is recorded when the temperature come
back to normal values
HOW TO RESET A RECORDED ALARM OR ONE THAT IS
STILL OCCURRING
1. Hold the SET key pressed for more than 3s, while the
recorded alarm is displayed. (the rSt message will be
displayed)
2. To conrm the operation, the “rSt” message starts
blinking and the normal temperature will be displayed
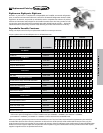
DEFAULT PARAMETER SETTINGS
2. Freezers