


11
PRO
3
Top Mount Packaged Refrigeration System | Outdoor
Programming the PJEZC Carel
Electronic Controller
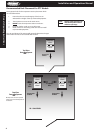
Reprinted with permission from Carel.
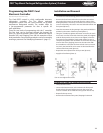
The Carel PJEZC control is a fully congurable electronic
refrigeration controller. The Top Mount packaged
refrigeration system uses the Carel controller on all three
temperature designated models. The models dier by
a pre-programmed parameter list that is specic for
each application.
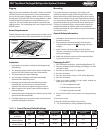
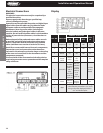
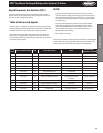
There are two levels of programming with the C controller.
The rst level can be accessed through the keypad. Set
Point (st), Interval between defrost (do), Maximum Defrost
Duration (dP), and Dripping Time (dd) are examples of rst
level parameters. Second level parameters can be accessed by
entering a password. See “Modifying Parameters” (page 17).
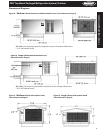
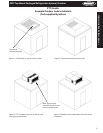
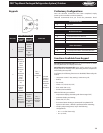
Installation and Removal
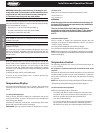
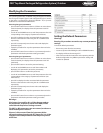
PANEL INSTALLATION FROM THE FRONT USING SCREWS
• The thickness of the fastening panel must not exceed 3 mm;
• Remove the front frame and make sure that the two catches
are in place (these must not protrude from the outline of the
drilling template). If necessary, unscrew the two screws. Do not
unscrew excessively, the screws must not be detached from the
front panel (phase 1);
• Insert the instrument in the opening in the panel and hold it in
position by the centre of the front panel (phase 1);
• Using the screwdriver, tighten the bottom screw 90°, the catch
must come out of its slot and click onto the panel, then tighten
until the front panel is secure; Do not over-tighten, when the
front panel is secured blocks simply make another ½ turn to
compress the gasket; If the catch does not click onto the panel,
unscrew the screw, applying pressure at the same time with
the screwdriver so that the catch moves back. Do not unscrew
too much, the head of the screw must not be raised from the
surface of the front panel (phase 2);
• Repeat the same operation for the top screw (phase 2);
• Apply the front frame (phase 3).
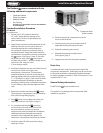
DISMANTLING USING THE SCREWS FROM THE FRONT
• Unclip the front frame;
• Unscrew the bottom screw, at the moment the front panel
detaches from the panel keep pressure on the screw and
unscrew a further 90° to make the catch go back into its slot;
• Repeat for the top screw;
• Remove the instrument from panel, keeping it horizontal
* Do not over-tighten the screws.
3. Controllers