


HB-121
2-5. PRINCIPLE OF OPERATION
AND CONTROLS
For best performance, your HB-121 should be level. Leveling
feet have been installed to compensate for uneven floors.
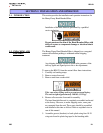
Your hand breader/sifter should be completely assembled before
beginning operation. To prepare for operation, place breading in
top lug and dip solution in the dip pot. The dip solution is the water,
or water and spices, that the product is dipped in before breading
the product. Dip product (chicken, ribs, etc.) in dip solution, letting
excess solution drain back into the dip pot. Place product in
breading and tumble until completely coated. Shake excess bread-
ing from product and place it on a pan equipped with a grid or
place it in a basket. The product is now ready for the frying pro-
cess. For sifting, the HB-121 is operated by an ON/OFF switch.
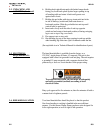
Remove the plug from the bottom of top breading lug and push
breading into the sifter basket. Start sifter by moving the switch
lever to the ON position. When all breading has been sifted, (2
minutes or less) and only dough balls remain, move the switch lever
to the OFF position. Remove the top breading lug. Remove the
sifter basket and dump the dough balls. Replace the sifter basket
and remove the lug with the sifted breading from underneath bin and
place it on top of the table. Put empty lug under the sifter bin.
Be sure the lug plug is in place or the breading will fall through
the lug to the sifter basket.
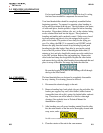
2-6. CLEANING The hand breader/sifter was designed to completely disassemble
PROCEDURES for easy cleaning. For cleaning, proceed as follows:
1. Disconnect the electrical supply to the unit.
2. Remove breading lugs, back splash, dip pot, dip pot holder, dip
basket, pan support, tray rack, sifter basket, basket bottom
(removable from side walls), spring clip, basket holder, and unit
top. These items can all be taken to a sink for a thorough
cleaning. (See exploded view in Technical Manual for
identification of parts.)
3. After brushing away all excess breading material from the sifter
bin, the entire interior of the bin can be thoroughly cleaned with
soap, water, and a soft sponge.
Avoid excess water around motor compartment.
4. Clean the exterior of the unit in the same manner.
203 2-3