


– 10 –
CLEANING — DAILY
Clean your fryer regularly. If regular cleaning is neglected, grease will be burned on and discolorations
may form. These may be removed by washing with detergent or soap and water. Particularly stubborn
discolorations may be removed with a self-soaping scouring pad or a paste made of water and a mild
scouring powder applied with a plastic open pad or sponge. Do not use standard steel wool on stainless
steel finishes. Steel wool particles will adhere to the stainless steel and cause rusting. Always rub in
the direction of the polish lines on the steel front to preserve the original finish.
Keep the fryer exterior clean and free of accumulated grease to prevent stubborn stains. Wash exterior
surfaces at least once daily. Wash with a cloth soaked in a solution of warm water and mild detergent.
Rinse with clear water. Dry with a clean cloth.
CLEANING — WEEKLY OR AS REQUIRED
Fry Tank, Heating Elements, and Thermostat Bulb
CAUTION: Do not pump water or water based cleaning solutions through the filter system to
avoid damaging the pump.
1. Once the shortening has been drained, flush out scraps and sediment with a small amount of
warm shortening. Allow the tank to drain thoroughly.
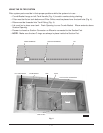
2. Remove all cooking oil from the filter tank by pumping it to suitable storage container(s) or discard
old oil. Remove filter tank, crumb basket, filter, drawer and drawer slides (refer to page 9).
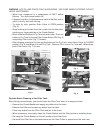
3. Close the Drain Valve (Fig. 8) and fill the tank with a solution of water and non-corrosive, grease
dissolving commercial cleaner (boilout compound), diluted to the cleaner manufacturer’s
instructions (refer to Tank Capacity, page 6).
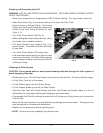
4. Set the temperature control at a temperature recommended by the manufacturer of the
commercial cleaner and boil the solution for 10 to 15 minutes. If cleaner is a water based
chemical, temperature control may be set at 190 – 212°F. Set the temperature as low as possible;
monitor boiling to prevent overflow. Do not leave fryer unattended. Turn Fryer Power Switch OFF
and allow the solution to set in the fry tank for another 10 – 15 minutes. The tank may be scrubbed
using a long handled brush. Do not use a metal brush or scouring pad to clean the fry tank interior.
Avoid skin contact with hot water and caustic solution.
5. Use care when draining the cleaning solution from the fry tank into a suitable container — do not
overfill the container. Close the drain valve and empty the container as often as necessary until
the fry tank is empty.
6. Close the Drain Valve (Fig. 8) and refill the tank with clean hot (minimum 140°F) water. Add 1
cup of vinegar to neutralize alkaline left by the cleaner. Turn Fryer Power Switch ON and boil
for a few minutes with the temperature control set at 190 – 212°F. Turn the Fryer Power Switch
OFF when done.
7. Again, use care when draining the cleaning solution from the fry tank into a suitable container
— do not overfill the container. Close the drain valve and empty the container as often as
necessary until the fry tank and the container are empty.
8. Dry the fry tank thoroughly.
9. Close the drain valve and add shortening to a level between the MIN and MAX markings on the
fryer tank wall. If using solid shortening, refer to
Melt Cycle
under
Adding Shortening
, page 6.