


– 5 –
INSTALLATION
Immediately after unpacking the disposer, check for possible shipping damage. If the disposer is found
to be damaged, save the packaging material and contact the carrier within 15 days of delivery.
Prior to installation, test the electrical service to make sure that it agrees with the specications on
the disposer data plate.
Temporary support, such as blocking, must be provided for the disposer during installation to avoid
excessive stress at welded or soldered cone to table connection.
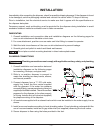
FABRICATING
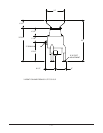
1. Consult installation and connection data and installation diagrams on the following pages for
cone or sink attachment dishtable cutout sizes.
2. For cone attachment, position cone so water swirl inlet tting is nearest to operator.
3. Weld the total circumference of the cone or sink attachment to prevent leakage.
4. Smooth grind and polish to match and blend weld seams.
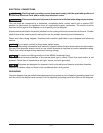
Do not place control mounting brackets in direct water splash areas.
PLUMBING CONNECTIONS
Plumbing connections must comply with applicable sanitary, safety, and plumbing
codes.
1. Consult installation and connection data and
installation diagrams on the following pages
for mounting, hookups, and pipe sizes.
2. Slide in, or position, disposer to connect to
waste line, avoiding as many bends, elbows,
and tees as possible.
3. Connect disposer from a
3
⁄4" IPS cold water
supply line. Install the ow control supplied
with the disposer. If the water line pressure
exceeds 60 psig, a pressure reducing valve (not
supplied) should be installed. The minimum ow
pressure for the disposer to function properly
is 16 psig. Install a shut-off valve (not supplied)
for proper servicing of the disposer.
4. All controls are supplied with a solenoid valve which must be installed in the water supply line as
shown.
5. Install a vacuum breaker according to local plumbing codes. If local plumbing codes prohibit the
use of vacuum breaker, install an air gap water inlet (not supplied) observing the local codes.
6. Secure disposer to oor using the holes provided in the feet.