– 6 –
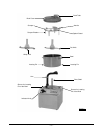
USE OF CUT OR WHIP KNIFE
The cut knife and whip knife are manufactured using high quality knife steel to give a keen cutting edge and
effective cutting action. Never leave this type of knife in a wet condition when not in use and never place it on
a stainless steel worktop.
Use the cut knife when meat, fish, fruit, vegetables, etc., are to be cut, pulverized and blended. Use the cut knife
also for grinding nuts and bread crumbs, and kneading/mixing dough.
Use the whip knife when the product(s) are to be blended only, for example: sauces, aromatic butter,
mayonnaise and soups. If the action of the whip knife is sluggish because of the consistency of the product, try
using the cut knife instead.
SCRAPER
The scraper will remove product (e.g., minced meat) which has stuck to the sides of the bowl and return it to the
cutting zone during processing. It can also be used to stir/mix products which do not stick to the sides. The
scraper has four blades so it is only necessary to move it through a quarter turn to scrape the entire internal
surface of the bowl. To move the scraper, grasp the handle and rotate it either clockwise or counterclockwise
until it reaches the stop. The scraper should be fitted at all times since the blades of the scraper guide the product
toward the cut knife even when the scraper is not activated.
FEED TUBE
A splashguard is fitted to the scraper. Rotate the scraper in order to open or close the feed tube. The machine
will operate with the feed tube open.
PREPARING THE PRODUCT
For the best and most consistent results, cut firm products such as meat and cheese into pieces of equal size
no larger than 1" cube.
When processing dry product (e.g. bread crumbs), place product into the bowl first, turn the machine on, then
add liquid ingredients.
When pureeing, be sure to rotate scraper to get all liquid off the sides of the bowl and back into the cutting zone.
OPERATING THE FOOD PROCESSOR
1. Assemble components as described in Steps 1-4 in the SETTING UP section of this manual.
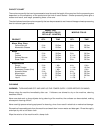
2. Add product. Refer to CAPACITY CHART in this manual.
3. Follow Steps 5 and 6 in the SETTING UP section of this manual.
4. For best results, use the pulse setting a few times at the beginning of the processing operation to cut product
into smaller pieces. Then set the indicator knob to the desired setting.
REMOVING BOWL
Always leave the cut/whip knife in the bowl when moving it so that the contents do not leak out through the tube
in the center of the bowl. To remove bowl, lift the arm slightly and rotate it to the rear to clear the bowl. Rotate
bowl slightly clockwise to unlock bowl locating pins from base, and lift bowl from machine.


