


– 4 –
INSTALLATION CODES AND STANDARDS
Hobart ovens must be installed in accordance with:
In the United States of America:
1. State and local codes.
2. National Fuel Gas Code, ANSI-Z223.1 (latest edition). Copies may be obtained from The American
Gas Association, Inc., 1515 Wilson Blvd., Arlington, VA 22209.
3. National Electrical Code, ANSI/NFPA-70 (latest edition). Copies may be obtained from The
National Fire Protection Association, Batterymarch Park, Quincy, MA 02269.
In Canada:
1. Local codes.
2. CSA B149.1 Natural Gas and Propane Installation Code.
3. CSA C22.2 Canadian Electrical Code.
The above are available from the Canadian Standard Association, 5060 Spectrum Way, Suite 100,
Mississauga, Ontario, Canada L4W 5N6.
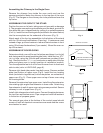
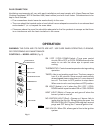
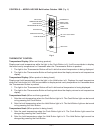
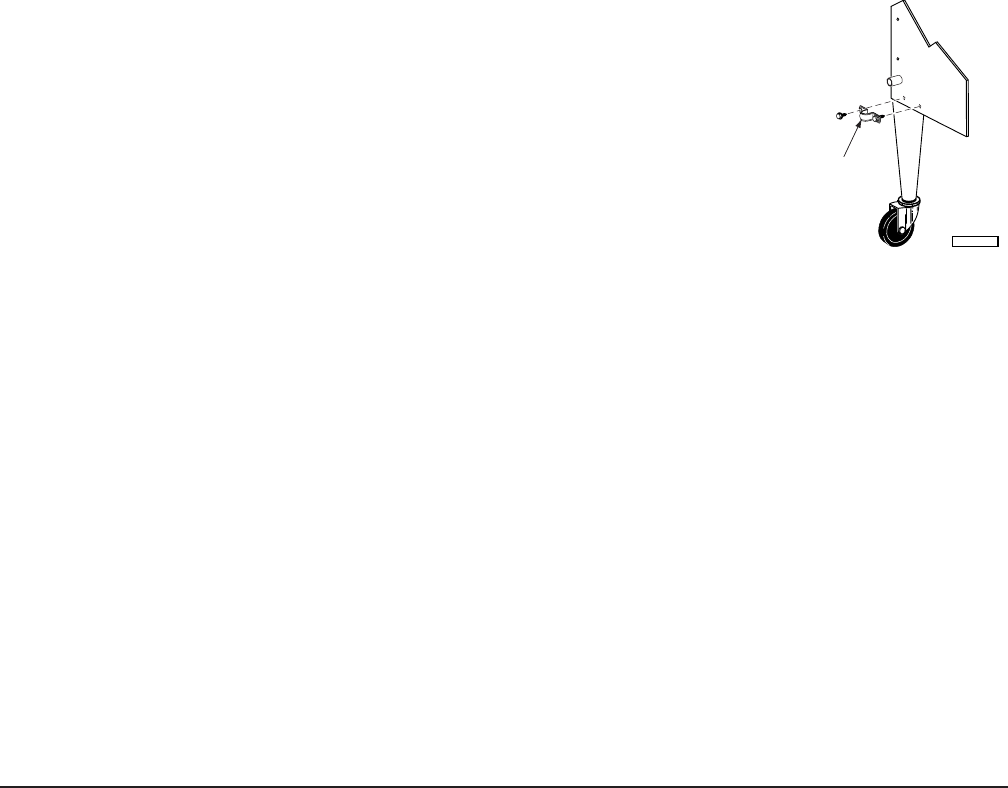
Ovens Mounted on Casters
Ovens mounted on casters must use a flexible connector (not
supplied by Hobart) that complies with the Standard for Connectors
for Movable Gas Appliances, ANSI Z21.69 • CSA 6.16 and a quick-
disconnect device that complies with the Standard for Quick-
Disconnect Devices for Use With Gas Fuel, ANSI-Z21.41 • CSA
6.9. In addition, adequate means must be provided to limit movement
of the appliance without depending on the connector and the quick-
disconnect device or its associated piping to limit appliance
movement. Attach the restraining device at the rear of the oven as
shown in Fig. 1.
If disconnection of the restraint is necessary, turn off the gas supply before disconnection. Reconnect
this restraint prior to turning the gas supply on and returning the oven to its installation position.
Separate instructions for installing casters to the oven are included with the casters.
Note: If the oven is installed on casters and is moved for any reason, it is recommended that the oven
be releveled front to back and side to side for even baking.
Assembling the Legs to the Single Oven
The 4"
(10 cm) or 6" (15 cm) legs are packed inside the oven during shipment and must be installed on
the bottom of the oven. Place the oven on its left side, being careful to avoid scratching the finish. The
gas pipe connection protrudes beyond the back; provide for this when oven is tipped back by resting
it on suitable spacers (2 x 4's etc.).
Thread each of the four leg assemblies into the holes provided on the bottom corners of the oven.
Carefully raise the oven to its normal upright position.
Fig. 1
CONNECT
GAS LINE
STRAIN RELIEF
HERE
PL-53563