


– 4 –
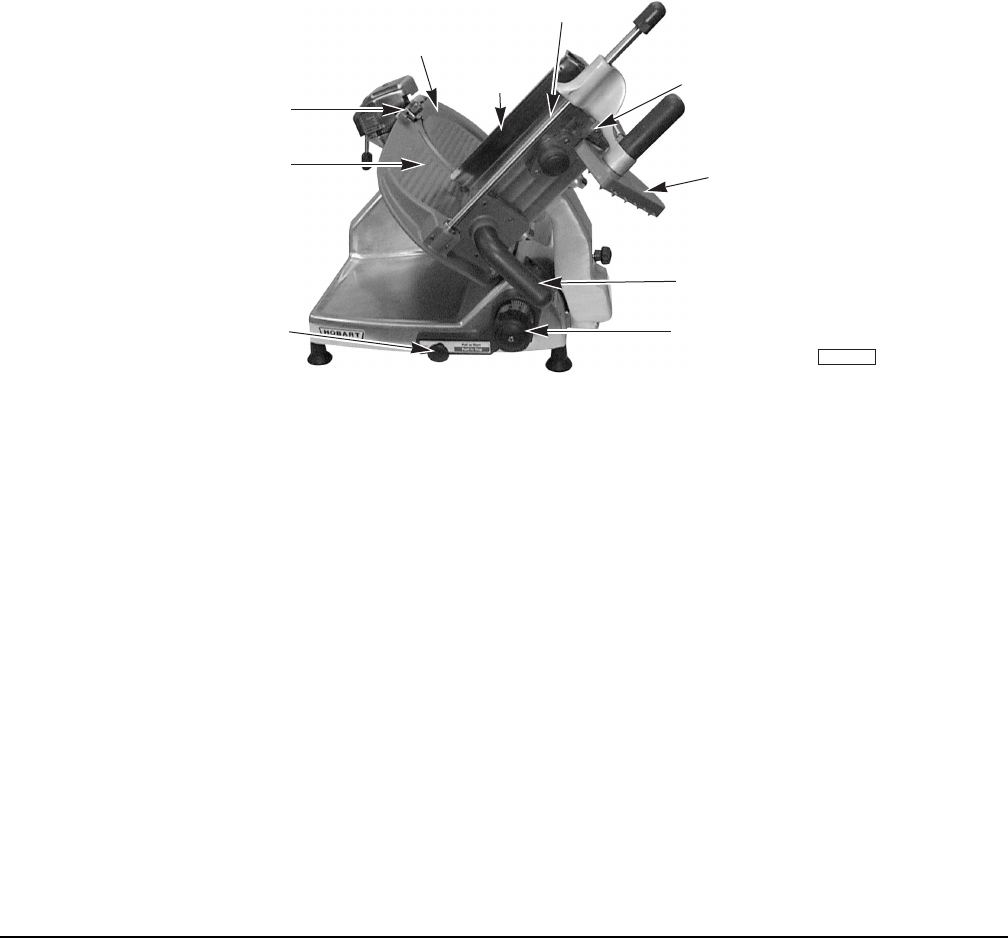
PL-41250-1
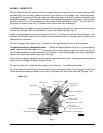
SWITCH KNOB
GAUGE PLATE
LATCH KNOB
TOP KNIFE COVER
CARRIAGE TRAY
RETAINING CLIP
MEAT GRIP
CARRIAGE TRAY HANDLE
INDEX KNOB
FENCE
OPERATION
SAFETY
SAFETY DEVICES INCORPORATED IN THIS SLICER MUST BE IN THEIR CORRECT OPERATING
POSITIONS ANYTIME THE SLICER IS IN USE.
The T
OP KNIFE COVER must be in position and secured with the LATCH KNOB (Fig. 2). The RING GUARD is
not removable. The D
EFLECTOR, mounted below the slicer knife, can be removed for cleaning.
The M
EAT GRIP (Fig. 2) must be used when slicing short ends to keep your hand(s) away from the knife.
When the slicer is not running, the I
NDEX KNOB (Fig. 2) must be turned back below zero (fully clockwise).
The G
AUGE PLATE will then cover the knife edge.
Always UNPLUG the P
OWER CORD before cleaning or moving the Slicer.
Model 2612
Fig. 2
WARNING: ROTATING KNIFE. USE FEED GRIP. UNPLUG MACHINE POWER CORD BEFORE
CLEANING, SERVICING, OR REMOVING PARTS. REPLACE PARTS BEFORE USE.
SLICING — MODEL 2612
With the Gauge Plate fully closed, pull the Carriage all the way toward you until it reaches its stop. With
the Meat Grip out of the way, place the product to be sliced on the Carriage Tray. Set the Meat Grip
against the product. Turn the slicer on by pulling the Switch Knob (Fig. 2) forward until it starts and
then releasing it.
If the Meat Grip is not needed, it may be stored out of the way by rotating it behind the top of the Carriage
Tray where it can rest on the Retaining Clip (Fig. 2).
Adjust the gauge plate to obtain the desired slice thickness by turning the Index Knob (Fig. 2). The
numbers on the Index Knob do not indicate actual measurements but may be used for reference to
duplicate slice thickness.
Use the Carriage Tray Handle (Fig. 2) to push the Carriage back and forth to slice.