


– 7 –
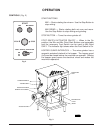
GRINDER ATTACHMENT
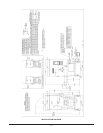
The grinder attachment can easily be removed for cleaning (see Cleaning, page 8). Use the spanner
wrench to loosen the adjusting ring and remove the adjusting ring, plate, knife, and worm (Fig. 3). Next
loosen, but do not remove the two flange nuts, using the spanner wrench. Rotate the cylinder
clockwise and remove the cylinder. At reassembly, make sure the cylinder's flange nuts are tight
before assembling the worm and adjusting ring. Use only the flange nuts provided.
A heavy duty tapered roller bearing, which is lubricated by transmission oil, takes the worm thrust. A
rubber seal at the drive end of the worm prevents loss of lubricant or entrance of moisture.
Before using the grinder attachment, take it apart and thoroughly wash it. The knife and plate need
some preliminary lubrication: Rub tallow or food grade mineral oil over the cutting faces of these parts.
When assembling the knife, be sure to turn the cutting side towards the perforated plate. The notch
on the circumference of the plate must fit over the pin in the cylinder. Knives and plates must be sharp
and true for proper cutting action. Keep the grinder attachment in a clean and sanitary condition.
MIXING ARM
Loosen the thumb screw and rotate the bushing retainer (Fig. 3). Raise the hopper guard, pull the
mixing arm from the drive slot, and lift the mixing arm from the hopper.
MIXING AND GRINDING
The model 4352 has a normal capacity of 230 pounds when using 80% fresh and 20% frozen chips;
275 pounds using 100% trimmings; or a maximum of 300 pounds of second grind through a
1
/8" plate.
Second cut meat may be mixed in the hopper for any desired length of time. During the MIX operation,
the mixing arm rotates in reverse direction from MIX-GRIND operation and the grinder worm does not
rotate. Continuous mixing occurs along with grinding in the MIX-GRIND operation. Mixing of uncut
or unground meat is not recommended.
Grinding Procedure
First Grind . . .
Fill the hopper and close the hopper guard. Overfilling will bend the hopper guard and may cause
the interlock to open the electrical circuit.
Push the MIX-GRIND Button to start grinding. Press the STOP Button to stop grinding.
Second Grind . . .
Fill the hopper and close the hopper guard. Press the MIX Button. After desired mixing, press
the STOP Button. Then, press the MIX-GRIND Button to start grinding; press the STOP Button
to stop grinding; or activate and use the optional accessory Foot Switch.