


11
Water connection
The inlet and drain hoses can be directed to
left or right.
The dishwasher can be connected to either
cold or hot water, as long as it is no hotter
than 60 °C.
Water pressure must be between 0,08 MPa
and 0,8 MPa. If the pressure is below the mini-
mum consult our service department for
advice.
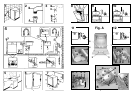
The inlet hose must be connected to a tap so
that the water supply can be cut off when the
machine is not in use (fig.1 B).
The dishwasher is fitted with 3/4" threaded
connector (fig. 2).
Connect inlet hose A to water tap B with a 3/4"
attachment making sure that it has been pro-
perly tightened.
If it is necessary to lengthen the inlet pipe, an
extension pipe can be fitted.
If limescale deposits or sand are present in the
water, it is advisable to obtain the appropriate
filter, art. 9226085, from the Service Centre
(fig. 3).
The filter D must be inserted between the tap
B and the inlet hose A, remembering to fit the
washer C.
If the dishwasher is connected to new pipes or
to pipes which have not been in use for a long
time run water through for a few minutes befo-
re connecting the inlet hose. In this way no
deposits of sand or rust will clog up the water
inflow filter.
Connecting the outlet hose
The outlet hose should disharge into a stand-
pipe, making sure that there are no kinks (fig. 4).
The standpipe must be at least 40 cm above
floor level and it must have an internal
diameter of at least 4 cm. It is advisable to fit
an anti-odour air trap (fig. 4 x).
If necessary the outlet hose can be extended
up to 2,6 m, provided that it is kept at a maxi-
mum height of 85 cm above floor level.
The hose can be hooked over the side of the
sink (it must not be immersed in water, in order
to prevent water from being syphoned back to
the machine when this is in operation) (fig. 4 y).
When installing the appliance under a worktop
the hose pipe clamp must be attached to the
wall in the highest possible position under the
worktop (fig. 4 z).
Check that there are no kinks in the inlet and
outlet hoses.
Installation in fitted
kitchens
Fitting between existing
cabinets
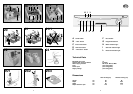
The height of the dishwasher, 85 cm, has been
designed in order to allow the machine to be
fitted between existing cabinets of the same
height in modern fitted kitchens. The feet can
be adjusted so that correct height is reached.
The laminated top of the machine does not
require any particular care since it is heat-
proof, scratchproof and stainproof (fig. 5).
The work top can be easily adjusted to line it
with the top of existing cabinets; this is done
by moving it by 5 mm each time up to a maxi-
mum of 25 mm.
To adjust it, unscrew the two screws at the
back and fix the top in the position required
(fig. 6).
Underneath existing work top
(when fitting beneath a work top)
In most modern fitted kitchens there is only
one single work top under which cabinets and
electrical appliances are fitted.
In this case remove the working top of the
dishwasher by unscrewing the screws under
the rear edge of the top (fig. 6).
The height will then be reduced to 82 cm, as
scheduled by the International Regulations
(ISO) and the dishwasher will fit perfectly
under the kitchen working top (fig. 7).
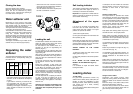
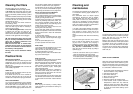
Opening the door
Put your hand into the recess and push upwards.
If the machine comes open while it is working,
an electrical safety device automatically
switches everything off.
For the machine to work properly, the door
should not be opened while it is in opera-
tion.
10
INSTALLATION
(Technical notes)
After unpacking, adjust the height of the
dishwasher.
For the dishwasher to work correctly it must be
level. Adjust the feet so that the machine does
not tilt by more than 2 degrees. If it you need
to move the machine after removing the
packaging, do not try to lift it by the bottom of
the door.
Open the door slightly and lift the machine by
holding on the top (Fig. 8).
Important: when the appliance is located
on a carpet floor, attention must be paid to
ensure that there is no obstruction to the
bottom vents.
Make sure that the plug on the appliance
remains accessible after installation.
This appliance complies with
Directives 89/336/EEC, 73/23/EEC
and following changes.
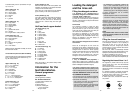
Electrical connection
Plug your dishwasher into the power socket.
If the plug we supply does not fit
• CUT IT OFF AND DESTROY IT!
You can't use it on other appliances, and the
exposed wires could be dangerous if anyone
plugged it in.
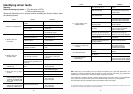
• Fit a suitable plug, as follows:
Connect to the terminal in the plug
green and yellow wire marked with the letter E,
OR marked with the Earth symbol,
OR coloured green,
OR coloured green and yellow.
blue wire marked N
OR coloured black.
brown wire marked L
OR coloured red.
“WARNING”
THIS APPLIANCE MUST BE EARTHED
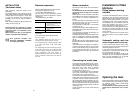
Fuses and plugs
This appliance should be used only on a
socket with a minimum rating of 13 Amp.
Our ready-fitted plug is already equipped with
a 13 amp fuse which is BS 1362 ASTA
approved.
Any replacement should be exactly the same.
If the fuse cover is lost, do not use the plug
until it is replaced. A correct replacement fuse
cover (obtainable from your dealer or
Electricity Board) must be the same colour as
shown or named on the insert on the base of
the plug.