


17
Cleaning and
maintenance
The outside of the cabinet can be cleaned with
a non-abrasive cleaning agent suitable for a
gloss finish.
The dishwasher does not require special
maintenance, because the tank is selfclea-
ning. Regularly wipe the door gasket with a
damp cloth to remove any food remains or
rinse aid. It is advisable to remove limestone
deposits or dirt periodically, by doing an empty
wash; pour a glass of vinegar on the bottom of
the tank and select the light wash.
If, in spite of the routine cleaning of the filters,
you notice that the dishes or pans are not pro-
perly washed or rinsed, check that all the
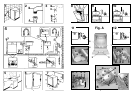
spray heads on the rotor arms (fig. A “5”) are
clear.
If they are blocked, clean them in the following
way:
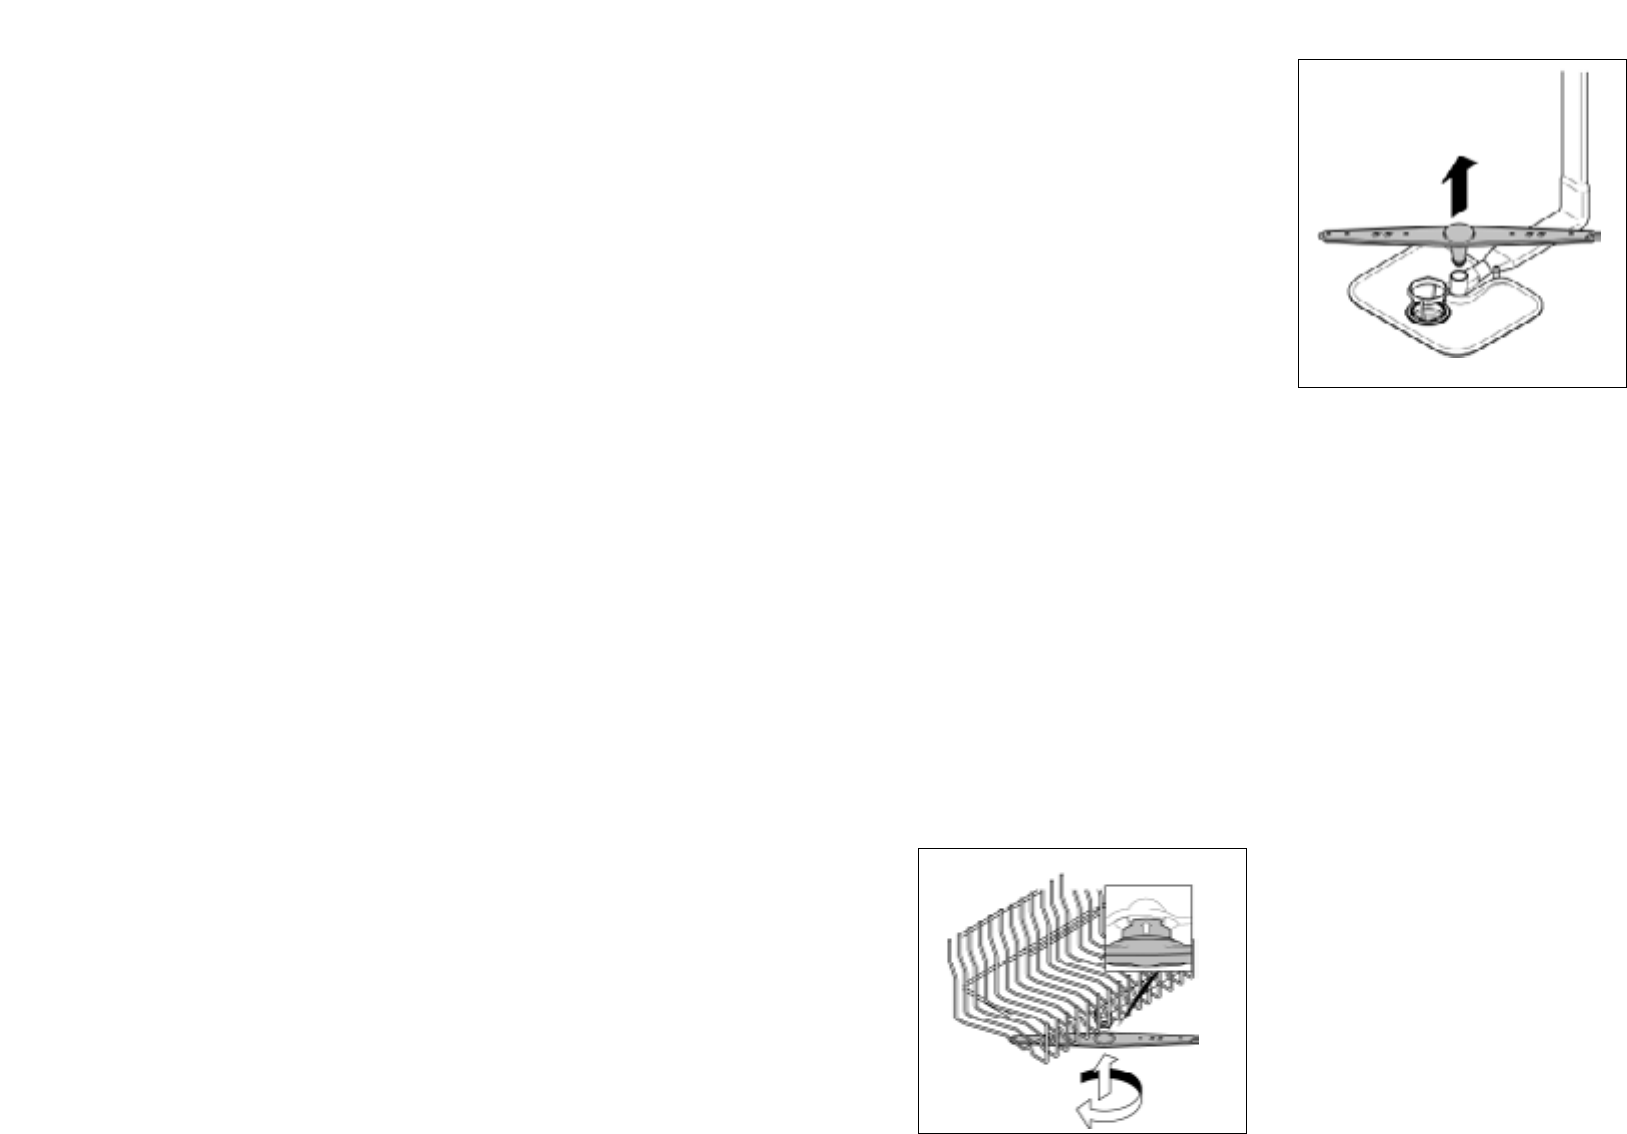
To remove the upper rotor arm, turn it until it
lines up with the stop marked by the arrow
(fig.1b). Push it upwards and, keeping it
pushed in, unscrew it in a clockwise direction.
To reassemble it repeat the same opera-
tion, but turn it anticlockwise. The lower
rotor arm can be removed simply by pulling it
upwards (fig. 2).
• wash the rotor arms under a jet of water to
clear any blockage in the spray heads.
• When you have finished, refit the rotor arms
in the same position, remembering to re-align
the arrow and screw into position.
The water heater element is made of a special
stainless steel which after a while may change
colour; this does not in any way affect its
performance or its working life.
Both the door lining and the tank lining are in
stainless steel; however, should spots caused
by oxidation occur, this is probably due to a
high level of iron salts presents in the water.
The spots can be removed with a mild abrasi-
ve agent; never use chlorine based materials,
steel wool, etc.
WHEN CYCLE IS FINISHED
After every wash it is essential to turn off water
supply and to switch off the machine by pres-
sing the On/Off button to the off position. If the
machine is not going to be used for some time,
it is advisable to follow these rules:
1. do an empty wash with detergent in order to
clean the machine of any deposits.
2. pull out the electric plug.
3. turn off the water tap.
4. fill the rinse aid container.
5. Ieave the door ajar.
6. Keep the inside of the machine clean.
7. If the machine is left in places where the
temperature is below 0°C any water left
inside the pipes may freeze. Wait until the
temperature rises above zero and then wait
for about 24 hours before starting up the
dishwasher.
2
1
1b
16
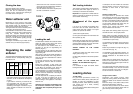
Cleaning the filters
The filter system (fig.A “4”) consists of:
a central container that traps the larger particles.
a flat gauze that continuously filters the wash
water a micro filter, located beneath the gauze,
that traps the tiniest particles ensuring a perfect
rinse.
To achieve excellent results every time, the filters
should be checked and cleaned after each wash.
To remove the filter unit, simply turn the handle
anticlockwise (fig. 25/1).
For ease of cleaning, the central container is
removable (fig. 25/2).
Remove the gauze filter (fig.25/3) and wash the
whole unit under a jet of water. If necessary a
small brush can be used.
With the Self-cleaning Micro filter, maintenance
is reduced and the filter unit need only be
checked every two weeks. Nevertheless, after
each wash it is advisable to check that the central
container and the gauze filter are not clogged.
NB: after cleaning the filters, make sure that
they are correctly reassembled and that the
gauze filter is properly positioned at the
bottom of the dishwasher.
Make sure that the filter is screwed back,
clockwise, into the gauze, as poor seating of
the filter unit could have an adverse effect on
the efficiency of the appliance.
Warning: never use the dishwasher without
the filters.
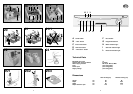
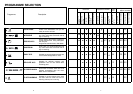
Practical hints
Selecting the programme
This dishwasher offers you a wide range of wash
programmes so that you can choose the most
suitable according to the type of dishes and how
dirty they are.
Refer to the PROGRAMME LIST to choose the
most suitable programme.
Useful hints
In order to avoid any dripping from the top rack,
remove the lower rack first.
If the dishes are to be left in the machine for
some time, leave the door ajar, to let some air
circulate and to improve the drying performance.
How to make SAVINGS
1) If you want the dishwasher to give a complete
wash, place the dishes in the dishwasher at the
end of each meal and if necessary turn on the
COLD PRE-WASH cycle to soften the food
remains and remove bigger particles of food from
the new load of dishes. When the dishwasher is
full start the complete wash cycle programme.
2) If the dishes are not very dirty or if the baskets
are not very full select an ECONOMY program-
me, following the instructions in the program list.
How to get really good wash RESULTS
1) Place the dishes face downwards.
2) Try to place the dishes in such a way that they
are not touching one another. If they are loaded
properly you will get better results.
3) Before placing the dishes in the dishwasher
remove any remaining food (bones, shells, pie-
ces of meat or vegetables, coffee grounds, skin
of fruit, cigarette ash etc. that could clog up the
outflow and the washing arm jets.
4) After loading the dishes check that the
washing arms can rotate freely.
5) Pans and other dishes that have particularly
stubborn food particles or remnants of burnt food
should be left to soak in water with dishwasher
detergent.
6) To wash silver properly:
a) rinse the silver immediately after use, espe-
cially if it has been used for mayonnaise, eggs,
fish etc.
b) do not sprinkle detergent onto it
c) keep it separate from other metals
What to DO if
1) You want to stop the dishwasher to put in more
dishes whilst it is in the middle of a wash.
Open the door only after pressing the O/I button
so that the dishwasher is in OFF.
After closing the door, wait 3 minutes before star-
ting up the machine again.
What not to wash
It should also be remembered that not all dishes
are suitable for washing in a dishwasher.
We advise against using the dishwasher to wash
items in thermoplastic, cutlery with wooden or
plastic handles, saucepans with wooden hand-
les, items in aluminium, crystal, leaded glass
unless otherwise stated.
Certain decorations may fade. It is therefore a
good idea before loading the whole batch to
wash just one of the items first so as to be sure
that others like it will not fade.
It is also a good idea not to put silver cutlery with
non-stainless steel handles into the dishwasher
as there could be a chemical reaction between
them.
IMPORTANT
When buying new crockery or cutlery always
make sure that they are suitable for washing in a
dishwasher.