


10
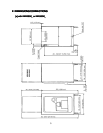
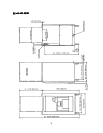
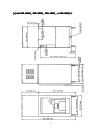
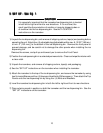
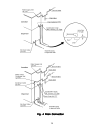
3. SET UP - See Fig. 1.3. SET UP - See Fig. 1.
3. SET UP - See Fig. 1.3. SET UP - See Fig. 1.
3. SET UP - See Fig. 1.
CAUTIONCAUTION
CAUTIONCAUTION
CAUTION
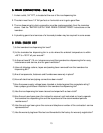
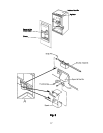
It is especially important that the icemaker/ice dispensing bin is leveled
in both left-to-right and front-to-rear directions. If it is not level, the
result could be the production of smaller or irregular shaped cubes or
of overflow into the ice dispensing bin. See the “LOCATION”
instructions on the icemaker.
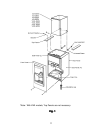
1) Unpack the ice dispensing bin, and remove all shipping cartons, tape(s) and packing before
operating the unit. Attach four (4) adjustable legs [adjustable within max. 6-13/32" (188 mm.)
to min. 6" (152 mm.)] to the bottom of the ice dispensing bin. Remove the front panel to
prevent damage, and be careful not to damage the other panels when installing the ice
dispensing bin.
Remove the screws, and pull up and toward you to remove the Front Panel.
2) Position the ice dispensing bin in a selected permanent site. Clean and wipe the interior with
a clean cloth.
3) Unpack the icemaker, and remove all shipping cartons, tape(s) and packaging.
4) See the “SET UP” instructions on the icemaker when installing the icemaker.
5) Attach the icemaker to the top of the ice dispensing bin, and secure the icemaker by using
two Universal Braces and four (4) Hexagon Head bolts (KM accessory). Then attach the Top
Panels onto the ice dispensing bin by using four (4) Bolts and Brackets.
6) Level the icemaker/ice dispensing bin in both the left-to-right and front-to-rear directions.
7) Place exterior panels in position on both the icemaker and the ice dispensing bin. See the
“SET UP” instructions on the icemaker.