


30
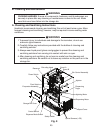
C. Preparing the Icemaker for Long Storage
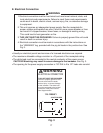
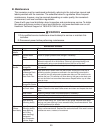
CAUTION
When storing the icemaker for an extended time or in sub-freezing
temperatures, follow the instructions below to prevent damage.
When the icemaker is not used for two or three days under normal conditions,
it is sufficient to only move the control switch to the "OFF" position. When
storing the icemaker for extended time or in sub-freezing temperatures, follow
the instructions below.
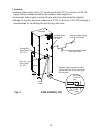
1. Remove the ice from the storage bin, drain the water system, and remove the
water from the icemaker water supply line:
1) Close the icemaker water supply line shut-off valve and open the icemaker water
supply line drain valve.
2) Move the control switch to the "DRAIN" position and allow the water system to drain for
5 minutes.
Note: If the unit is running, the drain valve will not open until 2.5 minutes after the
control switch is moved to the "DRAIN" position. This allows the components to
cycle down.
3) Move the dispense mode switch to the "CONTINUOUS" position, then dispense all of
the ice from the storage bin.
4) Attach a compressed air or carbon dioxide supply to the icemaker water supply line
drain valve.
5) While engaging the water dispense switch, blow out the water dispense valve using the
compressed air or carbon dioxide supply. After blowing out the water dispense valve,
leave the compressed air or carbon dioxide supply owing. Move the control switch
to the "ICE" position to open the inlet water valve and briey blow out the valve. After
blowing out the inlet water valve, move the control switch to the "OFF" position.
6) Close the icemaker water supply line drain valve.
7) Turn off the power supply, then remove the front panel and move the power switch to
the "OFF" position.
8) Remove the storage bin cover. Clean the storage bin liner and the storage bin cover
using a neutral cleaner. Rinse thoroughly after cleaning. Replace the storage bin cover
and the front panel in their correct positions.
Note: If your unit has a water-cooled condenser, leave the front panel off and go to the
next section.
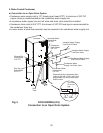
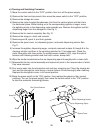
2. On water-cooled model only, remove the water from the water-cooled condenser:
1) Make sure the control switch and the power switch are in the "OFF" position and that
the power supply is off. Remove the top, apron, and left side panels.
2) Close the condenser water supply line shut-off valve. If connected to a closed loop
system, also close the condenser return line shut-off valve.
3) Open the condenser water supply line drain valve. If connected to a closed loop
system, also open the condenser return line drain valve.