


13
II. Installation and Operating Instructions
WARNING
1. This icemaker must be installed in accordance with applicable national, state,
and local codes and regulations.
2. CHOKING HAZARD: Ensure all components, fasteners, and thumbscrews
are securely in place after installation. Make sure that none have fallen into
the storage bin.
A. Checks Before Installation
•Visuallyinspecttheexterioroftheshippingcontainerandimmediatelyreportany
damage to the carrier. Upon opening the container, any concealed damage should also
be immediately reported to the carrier.
•Removetheshippingcarton,tape,andpackingmaterial.Ifanyareleftintheicemaker,
it will not work properly.
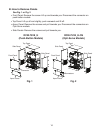
•Removethepanelstopreventdamagewheninstallingtheicemaker.See"II.B.Howto
RemovePanels."
•Removethepackagecontainingtheaccessories.
•Removetheprotectiveplasticlmfromthepanels.Iftheicemakerisexposedtothe
sun or to heat, remove the lm after the icemaker cools.
•Checkthattherefrigerantlinesdonotrubortouchlinesorothersurfaces,andthatthe
fan blade (if applicable) turns freely.
•Checkthatthecompressorissnugonallmountingpads.
•Seethenameplateontherearpanel,andcheckthatyourvoltagesupplied
corresponds with the voltage specied on the nameplate.
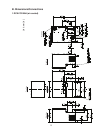
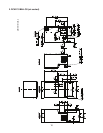
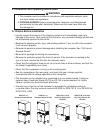
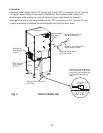
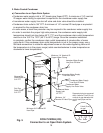
•Thisicemakercanbeinstalledonacountertoporonanoptionalstand.Ifusingan
optional stand, Hoshizaki Stand SD-700 or SD-750 is recommended. For further
options, contact your local Hoshizaki distributor.
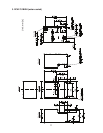
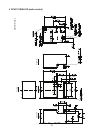
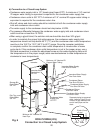
•Thedriptrayonthefrontoftheicemakerisremovableforinstallationsusingan
in-counter drain. Drip tray removal requires HS-5003 for DCM-751 B_H or HS-5002 for
DCM-751B_H-OS.
DCM-751 on
Hoshizaki Stand SD-700
DCM-751 on
Hoshizaki Stand SD-750
DCM-751B_H with
DripTray Removal Kit
HS-5003
DCM-751B_H-OS with
DripTray Removal Kit
HS-5002