


83
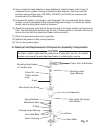
3. Removal and Replacement of Extruding Head
1) Drain the water from the evaporator.
a) Move the power switch to the "OFF" position.
b) Move the control switch to the "DRAIN" position.
c) Move the power switch to the "ON" position and allow the water to drain from the
evaporator.
d) Move the power switch to the "OFF" position, then turn off the power supply.
) Remove the panels.
3) Remove the strap connecting the spout to the chute assembly, then remove the spout.
4) Remove the bolt and lift off the cutter.
5) Remove the allen head cap screws and lift off the extruding head.
6) Place the new extruding head in place and tighten down the allen head cap screws.
7) Replace the cutter, cutter bolt, and spout.
8) Replace the panels in their correct positions.
9) Move the drain switch to the "ICE" position. Then, turn on the power supply.
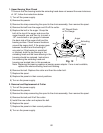
4. Removal and Replacement of Auger
1) Drain the water from the evaporator.
a) Move the power switch to the "OFF" position.
b) Move the control switch to the "DRAIN" position.
c) Move the power switch to the "ON" position and allow the water to drain from the
evaporator.
d) Move the power switch to the "OFF" position.
) Turn off the power supply.
3) Remove the panels.
4) Remove the strap connecting the spout to the chute assembly, then remove the spout.
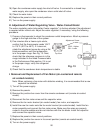
5) Remove the allen head cap screws securing the extruding head. Using the cutter, lift
out the auger assembly.
6) Remove the cutter bolt, cutter pin (aker only), cutter, and extruding head from the
auger and place on the new auger. (On aker models, a new cutter pin is supplied with
the new auger.)
7) Install the new auger.
8) Replace the removed parts in the reverse order of which they were removed.
9) Replace the panels in their correct positions.
10) Move the drain switch to the "ICE" position. Then, turn on the power supply.