


54
I. Removal and Replacement of Control Board
IMPORTANT
When receiving a service call, please ask the customer to turn the power off,
then turn it back on and monitor the condition for awhile. Even if the control
board malfunctions for some reason, it may resume normal operation after the
power is turned off once.
CAUTION
1. Fragile, handle very carefully.
. The control board contains integrated circuits, which are susceptible to
failure due to static discharge. It is especially important to touch the metal
part of the unit when handling or replacing the board.
3. Do not touch the electronic devices on the board or the back of the board to
prevent damage to the board.
4. Do not attempt to repair the board in the eld. Always replace the whole
board assembly if it goes bad.
5. Do not short out power supply to test for voltage.
6. Keep the thermistor leads, clogged lter sensor leads, and pressure switch
leads at least 1.5" away from high voltage leads (AC 100 volts or more) to
protect against electrical noise.
1) Turn off power and unplug the unit.
) Remove the front panel.
3) Remove the wire guard, then remove all wiring connections at the bottom of the control
box.
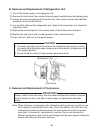
4) Remove the control box by loosening the 4×8 T screw securing the bottom control box
bracket to the evaporator case cover.
5) Remove the three 4×8 T screws from the control box top and bottom, then carefully
remove the control box cover.
6) Unhook all wiring connections to the control board.
7) Remove the control board by carefully removing the four 4×8 T attachment screws.
8) Identify the part number and software revision of the new board and make sure it is
interchangeable with the old board.
9) Install the new board in the control box taking care not to damage it.
10) Hook all wiring connections back to the control board.
11) Check to make sure that the switches and buttons line up appropriately on the display
panel and that they operate.
1) Replace all panels and guards.
13) Plug in the unit and turn on the power supply.