


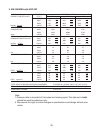

34
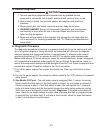
2. Float Switch Cleaning
Depending on local water conditions, scale may build up on the oat switch. Scale on the
switch can cause the oat to stick. In this case, the oat switch should be cleaned.
1) Turn off the power supply.
2)Removethefrontpanel,thenmovethecontrolswitchtothe"OFF"position.
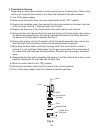
3) Remove the insulation panel, then remove the drain plug located on the lower front part
of the ice chute. See Fig. 1. Allow the water tank to drain.
4) Replace the drain plug in its correct position. Be careful not to cross thread it.
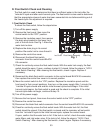
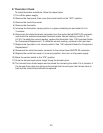
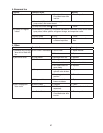
5) Disconnect the vent tube and the ush tube from the top of the oat switch, then remove
the oat switch assembly from the mounting bracket and remove the rubber boot from
the bottom of the oat switch assembly. See Fig. 2.
6) Remove the retainer rod from the bottom of the oat switch assembly, then remove the
oat. Be careful not to bend the retainer rod excessively when removing it.
7) Wipe down the oat switch assembly's housing, shaft, oat, and retainer rod with a
mixtureof1partHoshizaki"ScaleAway"and25partswarmwater.Cleantheinsideof
the rubber boot and hose with cleaning solution. Rinse the parts thoroughly with clean
water.
8) Reassemble the oat switch assembly and replace it and the rubber boot in their correct
positions. Reconnect the vent tube and the ush tube.
9)Movethecontrolswitchtothe"ICE"position.
10) Replace the insulation panel and front panel in their correct positions.
11) Turn on the power supply to start the automatic icemaking process.
Float
Float Switch
Housing
Rubber Boot
and Hose
Retainer Rod
Flush
Vent
Shaft
Fig. 2