


12
GB
PLEASE PHONE US TO REGISTER YOUR APPLIANCE AND ACTIVATE YOUR PARTS GUARANTEE ON 08448 24 24 24
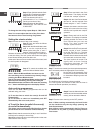
2. Turn the control knob anti-clockwise to the desired setting.
Only turn the control knob between the large ame symbol
and the small ame symbol for adjusting the setting.
3. To turn off, turn the control knob fully clockwise to the O
position.
DO NOT use mis-shapen pans which may be unstable.
DO NOT use round base woks directly on the pan supports.
Each burner is tted with a spark ignitor for lighting the gas.
To ensure rapid lighting of the burners every time they are
used, the ignitors must be kept clean and dry. Remove any
food spillage or cleaning materials from the ignitor using
a small nylon brush such as a tooth brush. Access to the
ignitor can be achieved by lifting off the loose burner parts
carefully when the burners are cool.
In the event of the burner flames being accidentally
extinguished, turn off the burner controls and do not attempt
to re-ignite the burners for at least 1 minute.
If aluminium based pans are used, a silvery deposit may
appear on the top edge of the pan support ngers. See ‘Care
and Cleaning’ section for cleaning information.
Models with Hob Gas Burner Safety Devices to
Prevent Leaks *
These models can be identied by the presence of the
device itself.
! Since the hob burners are equipped with a safety device,
you must hold the control knob in for about 3 seconds after
the burner has been lighted to allow the gas to pass until
the safety thermocouple has heated.
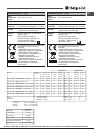
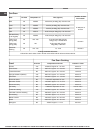
For the hotplate to work in the most efcient way possible
and in order to save on the amount of gas consumed, it is
recommended that only pans which have a lid and a at base
are used. They should also be suited to the size of the hotplate.
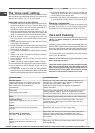
Hotplate ø Cookware diameter (cm)
Rear left 24 - 26
Front left 16 - 22
Centre rear 10 - 14
Front right 16 - 22
Rear right 16 - 22
Centre front (DCDR
internal)
10 -14
Centre front (DCDR
external)
26 - 28
! Make sure the pans do not overlap the edges of the hob
while it is being used.
Safety requirements for deep fat frying
1. Never ll chip pans more than one third full with oil or fat.
2. Never leave oil or fat unattended during the heating or
cooling period.
3. Never heat fat or fry with a lid on the pan.
4. Always dry food thoroughly before frying, and lower it
slowly into the hot oil or fat. Frozen foods in particular
will cause frothing and spitting if added too quickly.
5. Always keep the outside of the pan clean and free from
streaks of oil or fat.
How to deal with a fat re
1. Do not move the pan.
2. Turn off the hotplate burners.
3. Smother the ames with a re blanket or damp cloth to
extinguish the re. Do not use water or a re extinguisher
as the force of it may spread the burning fat or oil over
the edge of the pan.
4. Leave the pan for at least 60 minutes before moving it.
Griddle
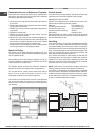
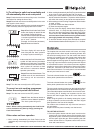
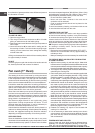
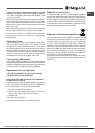
WARNING ! The oven is
provided with a stop system
to extract the racks and
prevent them from coming
out of the oven (1).
As shown in the drawing, to
extract them completely, simply
lift the racks, holding them on
the front part, and pull (2).
A non-stick griddle is supplied for use over the two burners
on the right hand side of the hob. The griddle is made of
cast iron and the surface is covered with a special nonstick
nish. To protect the non-stick coating never use metal
cooking utensils as they may scratch the surface. Wooden
or heat resistant plastic utensils may be used. Do not use
saucepans on the griddle plate.
UNDER NO CIRCUMSTANCES MUST THE GRIDDLE PLATE
BE USED OVER ANY OTHER HOTPLATE BURNERS.
Use of the griddle
The griddle may be used with either or both of the burners
on, depending on the food being cooked. The griddle can be
positioned with the ridged portion at the front or at the rear.
1. Secure the griddle above the two simmer burners, on the
right hand side of the hob, making sure that the support
feet are located correctly on the pan support ngers.
2. Press the ignition button and then push in and turn the
control knob(s) of the burners anticlockwise to the large
ame symbol. Continue to press the ignition button until
the spark lights the gas. Preheat the griddle plate for
approximately four minutes.
3. Place the food directly on the griddle plate. However
when cooking drier foods eg. drop scones the griddle
plate can be lightly greased.
4. The controls can be left at high for the sealing of foods or
turned down to a lower heat setting depending on what
food is being cooked.
* Only available on certain models