


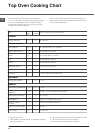
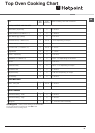

14
GB
PLEASE PHONE US TO REGISTER YOUR APPLIANCE AND ACTIVATE YOUR PARTS GUARANTEE ON 08448 24 24 24
Grill
CAUTION - ACCESSIBLE PARTS MAY BECOME
HOT WHEN THE GRILL IS USED.
YOUNG CHILDREN SHOULD BE KEPT AWAY.
The grill is fitted with a safety device that will cut off the
gas supply to the burner if the flame is extinguished
for any reason. Each time the grill is used, the safety
device has to be activated by pushing and holding in
the control knob for 3 seconds after the gas has lit.
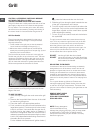
Grill Pan Handle
The grill pan handle is detachable from the pan to
facilitate cleaning and storage. Fix the pan handle
securely before use:
1. Fit the handle to the grill pan so that the external
‘hooks’ embrace the edge of the pan (fig. 1)
2. Make sure that the middle part of the handle fits
exactly the protruding support of the pan (fig .2) and
holds the pan from the bottom.
The food must be placed on the rack in the grill pan.
Position the grill pan on top of the oven rack. The best
results are achieved by placing the oven rack on the
uppermost shelves. Pouring a little water into the grill
pan will make the collection of grease particles more
efficient and prevent the formation of smoke.
The grill pan can be stored in the top compartment with
the handle attached by placing the shelf in the middle
or lower position and tilting the grill pan over the rear
edge of the shelf.
TO USE THE GRILL
1. Open the top oven/grill door and remove the grill
pan.
2. Remove the heat shield from the rear of the shelf
for maximum grilling area.
3. Place the shelf in the appropriate position.
4. Push in and turn the control knob clockwise to the
large flame symbol. Continue to push in the control
knob for a further 3 seconds after the gas has lit,
to allow time for the safety device to operate. If
the burner extinguishes when the control knob is
released, repeat the procedure ensuring the control
knob is fully depressed and allowing more time for
the safety device to operate.
For the models with the electronic ignition button (
), press the button and then turn the knob.
5. Slide the grill pan along the shelf towards the rear
of the grill compartment until it stops.
6. Turn the control knob anti-clockwise to reduce the
heat input. Only turn the control knob between the
large flame symbol and the small flame symbol
when adjusting the setting.
7. To turn off, turn the control knob anti-clockwise to
the symbol O.
The grill cannot be used at the same time as the top
oven. If for any reason the grill burner has not lit after
15 seconds, turn the control knob to the off position,
leave the grill door open and wait for at least one
minute before attempting to light the burner again. An
odour may be noticed when first using the grill this
should cease after a short period of use.
DO NOT use the grill with the door closed.
DO NOT cover the grill pan or grid with aluminium
foil as this can hold fat, intensify the heat
and create a fire hazard.
RELIGHTING THE BURNER
In the event of the burner flames being accidentally
extinguished, turn off the burner control and do not
attempt to re-ignite the burner for at least one minute.
Grilling can be started from cold but for best results
preheat for approximately two minutes. Most cooking
is done with the heat on full, but it may be desirable to
reduce it for thicker pieces of meat or for keeping food
warm.
For au gratin dishes eg. Macaroni Cheese and
meringue toppings eg. Baked Alaska, place the dish
on the floor of the grill compartment. The base of the
grill pan can be used for warming fruit garnishes on the
reduced setting.
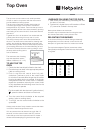
REMOVE HEAT SHIELD
FROM SHELF WHEN
GRILLING FOR MAXIMUM
GRILLING AREA.
NOTE: Strong detergents
used in dishwashers may
damage the grill pan grid finish; clean in soapy water
as described in CARE AND CLEANING section.
Always ensure that the grill pan handle is correctly
fitted to the grill pan.
1
2