


4
GB
PLEASE PHONE US TO REGISTER YOUR APPLIANCE AND ACTIVATE YOUR 5 YEAR PARTS GUARANTEE ON 08448 24 24 24
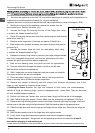
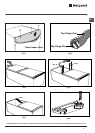
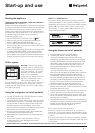
Reversing the Doors
plug I
food into insulated containers whist carrying out this operation.
1. Lay down the appliance on its back.You may require assistance to carefully lay the appliance on to
)gnigakcap lanigiro .e.i( lairetam evitcetorp elbatius a otno kcab sti
2. Working from the top of the appliance, remove the screws from the
door header cover .Remove the cover Fig.1
3. Unscrew the Hinge Pin securing the top of the Fridge door using
a suitable flat bladed screwdriver.Fig.2
4. Gently lift and slide the top door away from centre hinge pin and carefully
place to one side.Fig.3
5. Remove centre hinge block (2 screws) and spacer (if fitted).Fig.4
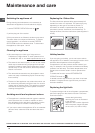
6. Slide bottom door upwards and away from lower hinge pin an
d place to
one side.Fig.5
7. Unscrew the bottom hinge pin from the white plastic block using
a suitable flat bladedscrewdriver.Fig.6
8. R
elease the bottom hinge block by removing two large hexagonheaded
bolts from underneath hinge plate, and the two plinthscrews (this then
releases the plinth and the white plastic hingeblock).
9. Slide out the blanking cover from plinth and refit on oppositeside.
10. Pass the white block through the space in plinth on the left side.
Refit t
he plinth and block simultaneously.
11. Refit 2 large bolts into white hinge block and the screws into theplinth.
They must be secure, but do not overtighten.
1
2. Place the bottom hinge pin in the outer hole on the hinge blockand
screw in securely with a suitable flat bladed screwdriver.
13. Remove and transfer all blanking caps and screws from thecentre left transom, over to the
holes on right vacated by thecentre hinge screws.
14.Refitting the Doors: Examine the tops and bottoms of both doors a
nd wherenecessary
transfer all hinge pin blanking plugs / plates to theopposite side - where fitted. They can be prised
out with smallflat bladed screwdriver.
15. Position
and slide the Freezer door onto the lower hinge pin.Ensure this is fully engaged.
16. Refit Centre Hinge (and spacer if fitted). Make sure the screwsare fully tightened. See Fig.4.
17. Remove the hinge blanking plate from top of the fridge. Remove right hand top hinge. Invert and
transfer over to left side using the original screws. Refit the blanking plate
to the opposite side.
18. Place the fridge door onto centre hinge pin and align with top hinge arm. Screw the top hinge pin
in securely.
19. Refit the door header cover to the fridge door with original screws
20. Finally check fri
dge and freezer door operation and stand the appliance upright.
21.Note:Replace loose items / fittings back into the appliance and leave it to stand for at least 2
hours before plugging in and switching on.
*appliance lied down, must have protected the back side components (by using soft supports, EPS)
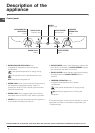
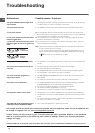
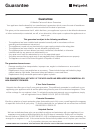
Hinge
plate
Hinge
Pin
Hinge
Block
Hexagon
bolts
Foot
Hinge Block
Exploded View