


You will need a cross head screwdriver, a flat blade screwdriver and a 5mm spanner to carry out this
procedure.
Our Service Department can arrange for an Engineer to do the conversion for you but a charge will
be made.
WARNING: Switch off electrical supply and pull out the mains plug.
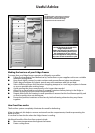
Remove all door furniture and all loose items/fittings from inside the fridge freezer.
If you have previously set up and used the fridge freezer and since decided to reverse the doors, you
must remove stored food, wrap or cover it and place into insulated containers to keep cool/frozen
whilst carrying out this operation.
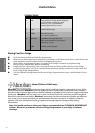
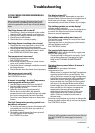
Remove Top Door
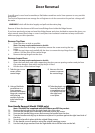
1. Open the door as wide as possible.
Note : You may require assistance to do this:
2. Support the door and using a screwdriver, remove the screw securing the top
hinge.
3. Lower the top hinge and carefully tilt the door to remove the top hinge from the
cabinet. Lift the door off the centre hinge.
4. Remove the top hinge from the door.
Remove Lower Door
Note : You may require assistance to do this:
5. Open the lower door and while supporting the door, remove spacing washers and pin from
the centre bracket. Note which way up the pin is fitted.
6. Lift the door off the bottom hinge.
Door Reversal
17
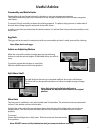
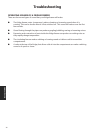
7. Take the two screw
covers off the
centre hinge.
8. Unscrew the two
screws to remove
the centre hinge.
10. Take the plastic cap
from the left hand
cover plate and use
it to fill the hole on
the right hand
cover plate.
9. Using a flat blade
screwdriver or a
5mm spanner,
remove the bottom
hinge pin complete
with spacing
washers, from the
right hand hinge
bracket.
CLEANING &
MAINTENANCE
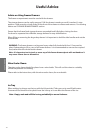
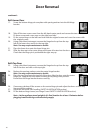
Door Handle Reversal (Model FFM90 only):
Note : This MUST be completed while BOTH doors are OFF the product.
11. Remove the hole plugs from the right hand side of the door.
12. Unscrew the handle cover retaining screws and remove the covers.
13. Unscrew the handle fixing screws and remove the handle from the door.
14. Turn the handle vertically, top to bottom and place it in position against the right hand side of
the door.
15. Secure the handle in place with the original fixing screws.
16. Fit the handle covers in position, using the original retaining screws.
17. Use the hole plugs removed from the right hand side to fill the holes on the left.