


10
GB
PLEASE PHONE US TO REGISTER YOUR APPLIANCE AND ACTIVATE YOUR PARTS GUARANTEE ON 08448 24 24 24
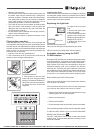
the oven, set to 40° using the LOW TEMPERATURE
manual function, and leave to rise for approximately
30–45 minutes. Alternatively, leave at room temperature
for approximately 1 hour (until the dough has doubled in
volume).
• Break up the dough, kneading gently, and divide it to
create several loaves.
• Place them on a sheet of baking paper (cut to the same
size as the inside of the dripping pan) on top of the rack
(or on 2 or 3 racks if you wish to cook the loaves on
different shelves) and dust them lightly with our.
• Make a few incisions in the top using a sharp blade.
• Place the rack in the oven, on shelf level 2 if using only
one level, or place two racks on shelf levels 1 and 4 if
using two levels, or place three racks on shelf levels 1,
3 and 5 if using three levels.
• Place the dripping pan on shelf level 7 and pour in
150 g cold water.
• Place the food inside the oven while it is still cold.
• Start the automatic function BREAD.
• When the cooking process has nished, leave the loaves
to rest on the rack until they have completely cooled.
Small Space
Starting the oven
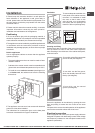
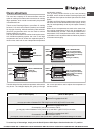
1. Fit the DIVIDER to the DIVIDER shelf “D” using the pin,
with the arrows turned towards the rear part of the oven. A
buzzer will sound to conrm that the DIVIDER has been tted
correctly; it will then be possible to use the two Main and
Small Space compartments separately or at the same time.
! The EXTRALARGE SPACE FUNCTION knob will be
disabled.
2. Select the desired cooking function by turning the SMALL
SPACE FUNCTION knob.
3. The oven will begin its preheating stage. The temperature
may be changed by turning the TEMPERATURE knob. The
indicator light ashes during the preheating stage.
4. Once the preheating stage is completed, the icon
stops ashing (becomes xed) and a buzzer sounds. Food
may now be placed inside the oven.
5. During cooking it is always possible to:
- change the cooking function by turning the SMALL SPACE
FUNCTION knob;
- change the temperature by turning the TEMPERATURE
knob;
- set the cooking duration and the cooking end time;
- stop cooking by turning the SMALL SPACE FUNCTION
knob to the “0” position.
6. If a blackout occurs while the oven is already in operation,
an automatic system within the appliance will reactivate the
cooking function from the point at which it was interrupted,
as long as the temperature has not dropped below a
certain level. The clock and programmed cooking modes
which have not yet started will not be restored and must
be reprogrammed.
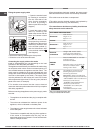
Cooking functions
GRILL function
The top heating element comes on. By turning the
TEMPERATURE knob, the different power levels which
may be set will appear on the display; these range between
5% and 100%. The high and direct temperature of the grill
is recommended for food which requires a high surface
temperature. This function is particularly suitable for browning
food, cooking gratins, colouring meringues, making toasted
sandwiches and grilling small quantities of thin, lean meat.
Always cook in this mode with the oven door closed.
FAST COOKING function
This function requires the oven to be preheated. This
function is particularly suitable for cooking pre-packed food
quickly (frozen or pre-cooked).
Main Space
Starting the oven
1. Fit the DIVIDER to the DIVIDER shelf “D” using the pin,
with the arrows turned towards the rear part of the oven. A
buzzer will sound to conrm that the DIVIDER has been tted
correctly; it will then be possible to use the two Main and
Small Space compartments separately or at the same time.
! The EXTRALARGE SPACE FUNCTION knob will be disabled.
2. Select the desired cooking function by turning the MAIN
SPACE FUNCTION knob.
3. The oven will begin its preheating stage. The temperature
may be changed by turning the TEMPERATURE knob. The
indicator light ashes during the preheating stage.
4. Once the preheating stage is completed, the icon
stops ashing (becomes xed) and a buzzer sounds. Food
may now be placed inside the oven.
5. During cooking it is always possible to:
- change the temperature by turning the TEMPERATURE
knob;
- set the cooking duration and the cooking end time;
- stop cooking by turning the MAIN SPACE FUNCTION
knob to the “0” position.
6. If a blackout occurs while the oven is already in operation,
an automatic system within the appliance will reactivate the
cooking function from the point at which it was interrupted,
as long as the temperature has not dropped below a certain
level. Programmed cooking modes which have not yet
started will not be restored and must be reprogrammed.
Cooking functions
UNIVERSAL function
All heating elements and the fan are activated. Since the
heat remains constant throughout the oven, the air cooks
and browns food in a uniform manner. A maximum of three
racks may be used at the same time.
If you are using several racks at the same time, we