


GB
11
PLEASE PHONE US TO REGISTER YOUR APPLIANCE AND ACTIVATE YOUR PARTS GUARANTEE ON 08448 24 24 24
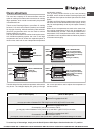
recommend you place the dripping pan on shelf level
1. If you are cooking on 3 levels at the same time, we
recommend you place the shelves on racks 3 and 5, and
the dripping pan on rack 1.
Using the Small Space and Main Space at
the same time
! Simultaneous operation is only possible when using the
Creation functions
Starting the oven
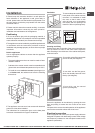
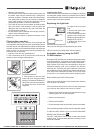
1. Fit the DIVIDER to the DIVIDER shelf “D” using the pin,
with the arrows turned towards the rear part of the oven. A
buzzer will sound to conrm that the DIVIDER has been tted
correctly; it will then be possible to use the two Main and
Small Space compartments separately or at the same time.
! The EXTRALARGE SPACE FUNCTION knob will be disabled.
! In order to improve the energy efciency of the oven , the
preheating time of the SMALL SPACE cavity lasts about
15 minutes.
! If the MAIN SPACE is set to a temperature below 175°C,
in order to safeguard the cooking results, the grill function
will not start: the text “OFF” will appear on the display.
2. Select the desired cooking function for each cavity by
turning the SMALL SPACE FUNCTION and/or MAIN SPACE
FUNCTION knobs. The icon indicates that the Small
Space has been selected and that it is therefore possible to
adjust the Small Space settings; the icon lit up on the
display indicates that the Main Space has been selected and
that it is therefore possible to adjust the Main Space settings.
3. Both ovens will begin the preheating stage. The temperature
may be changed by turning the TEMPERATURE knob. The
indicator light ashes during the preheating stage.
4. Once the preheating stage is completed, the icon
stops ashing (becomes xed) and a buzzer sounds. Food
may now be placed inside the oven.
5. The digits on the display become brighter to indicate which
cavity you are adjusting. To modify the settings for the other
cavity, press the button. The Small Space and Main Space
settings may actually be changed during simultaneous cooking:
- change the cooking function by turning the SMALL SPACE
FUNCTION and/or MAIN SPACE FUNCTION knob;
- change the temperature by turning the TEMPERATURE knob;
- set the cooking duration and the cooking end time;
- stop cooking by turning the SMALL SPACE FUNCTION
and/or MAIN SPACE FUNCTION knob to the “0” position.
6. If a blackout occurs while the oven is already in operation,
an automatic system within the appliance will reactivate the
cooking function from the point at which it was interrupted, as
long as the temperature has not dropped below a certain level.
The clock and programmed cooking modes which have not
yet started will not be restored and must be reprogrammed.
Programming cooking
! A cooking function must be selected before programming
can take place.
Programming is possible in all oven configurations:
EXTRALARGE, MAIN and SMALL SPACE, even if the latter
two are being used simultaneously.
Programming the cooking duration
1. Press the button several times until the icon and
the three numerical digits on the DISPLAY begin to ash.
2. Turn the SET TIME KNOB towards “ ” and “ ” to adjust
the duration.
3. Press the button again to conrm.
4. When the set time has elapsed, the text END appears
on the DISPLAY, the oven will stop cooking and a buzzer
sounds.
• For example: it is 9:00 a.m. and a duration of 1 hour
and 15 minutes is programmed. The function will stop
automatically at 10:15 a.m.
Setting the end time for a cooking mode
! A cooking duration must be set before the cooking end
time can be scheduled.
1. Follow steps 1 to 3 to set the duration as detailed above.
2. Next, press the button until the icon and the two
digits on the DISPLAY begin to ash.
3. Turn the SET TIME KNOB towards “ ” and “ ” to adjust
the hour value.
4. Press the button again so that the other two numerical
digits on the DISPLAY begin to ash.
5. Turn the SET TIME KNOB towards “ ” and “ ” to adjust
the minute value.
6. Press the button again to conrm.
7. When the set time has elapsed, the text END appears
on the DISPLAY, the oven will stop cooking and a buzzer
sounds. Programming has been completed when the
and icons light up. The DISPLAY shows the cooking
end time and the cooking duration alternately. To cancel
programming, turn the FUNCTION knob to the “0” position.
Practical cooking advice
MULTILEVEL
• Use positions 1, 3, 5 and 6.
• Place the dripping pan at the bottom and the rack at the
top.
BARBECUE
• Preheat the oven for 5 minutes.
• Keep the oven door closed when cooking in this mode.
• Place the dripping pan on shelf level 3. Place the rack
in a position between 4 and 7, depending on how bulky
the food is, and make sure the food is in the centre of
the rack. Examples: beef ribs should be cooked on shelf
level 4 and bacon on shelf level 6 or 7.