


18
GB
PLEASE PHONE US TO REGISTER YOUR APPLIANCE AND ACTIVATE YOUR PARTS GUARANTEE ON 08448 24 24 24
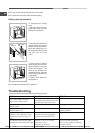
! Do not touch the light bulb directly with your hands.
! Do not use the oven lamp as/for ambient lighting.
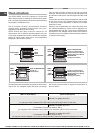
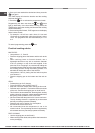
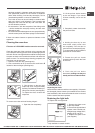
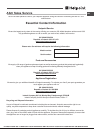
Sliding rack kit assembly
To assemble the sliding
racks:
1. Remove the two frames,
lifting them away from the
spacers A (see gure).
2. Choose which shelf to use
with the sliding rack. Paying
attention to the direction in
which the sliding rack is to
be extracted, position joint B
and then joint C on the
frame.
3. Secure the two frames
with the guide rails using the
holes provided on the oven
walls (see diagram). The
holes for the left frame are
situated at the top, while the
holes for the right frame are
at the bottom.
4. Finally, t the frames on
the spacers A.
! Do not place the sliding racks in position 5.
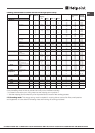
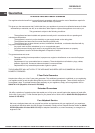
Troubleshooting
A
B
C
Left
guide rail
Right guide
rail
Direction
of extraction
D
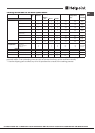
Problem Possible cause Solution
The appliance has just been
connected to the electricity mains
or there has been a blackout.
Set the clock.
A programmed cooking mode
does not start.
There has been a blackout. Reprogram the cooking mode.
Only the high luminosity
“Clock button” is lit.
The appliance is in standby mode Press any button to exit
standby mode.
The temperature inside the oven
is higher than the suggested
value for the selected mode.
Wait for the oven to cool down.
Fan-assisted cooking has been
selected and the food looks burnt.
Positions 1 and 5: the direct
heat could cause
temperature-sensitive
foods to burn.
We recommend switching
dripping pan positions halfway
through cooking.
The “Clock button” and the
digits on the display flash.
An automatic mode has been
selected. “Hot” appears on the
display and cooking does not
start.