


Rev. 0608
3
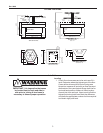
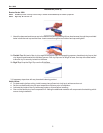
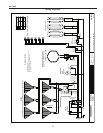
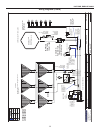
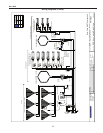
Cut and Plan Views
RHR2-HEX 6' & (4')
Self-Service Hot
Scale = 1/2"
43
1
/
4
" (25
1
/
8
")
Control
Panel
54
1
/
4
" (47
3
/
8
")
W
ar
m
in
g
G
ri
d
d
le
58"
21
1
/
16
"
32
9
/
16
"
10
1
/
2
"
10
1
/
2
"
28
1
/
2
" (19
1
/
2
")
Food
Warmer
12"
18
3
/
4
"
13"
12
1
/
4
"
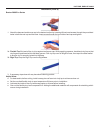
RHR SQUARE
Self Service Hot Food
20
11
/
16
"
47
3
/
8
"
27"
ELEC.
MECHANICAL
STUB UP AREA
4" X 6"
23
11
/
16
" (33
3
/
8
")
4'-6
7
/
16
" (6'-5
3
/
8
"
)
RHR-HALF-HEX-4' (6')
Self-Service Hot
14
1
/
8
" (24
5
/
8
")
2'-2
1
/
2
" (3'-1
1
/
2
"
)
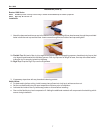
RHR-HEX 6' & (4')
Self-Service Hot
43
1
/
4
" (25
1
/
8
")
Control Panel
64
1
/
4
" (47
1
/
8
")
Wa
rm
in
g
Gr
iddle
50
1
/
4
"
21
1
/
16
"
32
9
/
16
"
10
1
/
2
"
Light
Food
Warmer
10
1
/
2
"
18"
28
1
/
2
" (19
1
/
2
")
Light
Food
Warmer
77
3
/
8
"
37
1
/
2
"
65
3
/
8
"
(47
3
/
8
")
48
3
/
4
"
(27
5
/
8
")
(26
1
/
2
")
(54
7
/
16
")
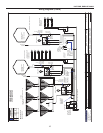
RHR-HEX 6' & (4')
PLAN VIEW
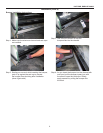
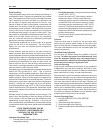
Installation
IMPORTANT: It is imperative that cases
be leveled front to back and side to
side prior to joining.A level case is
necessary to ensure proper operation.
Leveling
1. Check oor where cases are to be set to see if it’s
level. Determine where the highest part of the oor
Cases will be shimmed off this point Using case
blueprints, measure off and mark on oor the exact
dimensions of the case footprint Snap chalk line for
front and back position of base rail. Mark location
of each joint front and back. Use a transit to nd the
highest point along both lines. Mark the difference,
and place the appropriate number of shims required
to maintain high-point level.