


3
91256
Once these start–up procedures are complete, the chiller is ready for standard operation.
NOTE:
1) Never operate the chiller with enclosure panels removed.
2) Always use the illuminated switch to turn off the chiller when it is not being used.
3) Always ensure that all air inlets and outlets are free of obstructions.
MAINTENANCE
WARNING: Disconnect electrical power from the Unit before performing any of the
following maintenance procedures.
The chiller requires very little normal maintenance. The condenser fins should be cleaned by blowing com-
pressed air through the condenser. from the fan side as required to prevent blockage of air flow by dirt and de-
bris that may accumulate over time. The condenser fan motor should be lubricated every six months with a few
drops of SAE 10 oil. The positive displacement pump motor should be lubricated with ten drops of SAE 20 oil
once each year. The circulation system should be drained and flushed periodically to avoid build up and pos-
sible restriction of flow by contaminants. Following these simple procedures will ensure many trouble free hours
of chiller operation.
SERVICE
Service of the chiller is limited to replacing the switch, the thermostat, the fan motor, and the pump. Charging
and other refrigeration problems must be performed by a qualified refrigeration technician.
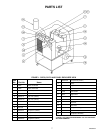
REMOVING WRAPPER
1. Disconnect electrical power from the Unit.
2. Remove the seven screws from each side of the wrapper and the two screws that secure the wrapper to
the front and back panels. Retain all hardware and lift the wrapper off the Unit.
REPLACING SWITCH
1. Remove the wrapper as specified in REMOVING WRAPPER.
2. Remove the spade lugs from the existing switch and note connection points.
3. Remove the switch from the front panel.
4. Install the new switch in the front panel and connect the leads to the new switch.
5. Install the wrapper.
REPLACING STANDARD THERMOSTAT
1. Remove the wrapper as specified in REMOVING WRAPPER.
2. Loosen the screw terminals securing the wires at the rear of the thermostat. Note connection points and
remove the wires.
3. Remove the screw securing the mounting bracket to the back of the thermostat.
4. Remove the thermostat from the front panel.