


5
GB
Start-up and use
! The first time you use your appliance, heat the
empty oven with its door closed at its maximum
temperature for at least half an hour. Ensure that the
room is well ventilated before switching the oven off
and opening the oven door. The appliance may emit
a slightly unpleasant odour caused by protective
substances used during the manufacturing process
burning away.
! Before operating the product, remove all plastic
film from the sides of the appliance.
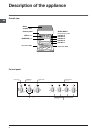
Starting the oven
1. Select the desired cooking mode by turning the
SELECTOR knob.
2. Select the desired temperature with the
VARIABLE GRILL knob. See the Cooking advice
table for cooking modes and the suggested cooking
temperatures (
see Cooking Modes
).
3. When preheating is finished, the THERMOSTAT
indicator light will stay on: place the food in the
oven.
4. You may do the following during cooking:
- change the cooking mode by turning the
SELECTOR knob.
- change the temperature by turning the VARIABLE
GRILL knob.
- stop cooking by turning the SELECTOR knob to the
“0” position.
! Never put objects directly on the oven bottom to
avoid damaging the enamel coating.
! Always place cookware on the rack(s) provided.
When the SELECTOR knob is turned in a clockwise
direction to the symbol
the fan and oven light
will come on to assist in the defrosting of frozen
food. Rotating further to the complete range of
temperatures shown on the dial you can choose
which is most suitable for the food you are going to
cook (fan assisted mode). The temperature is
reached automatically and controlled by the oven
thermostat (from 60°C to 240°C).
Grill
The top heating element will come on. On this
setting, food is cooked by the thermal radiation
given off in the downward direction by the electric
heating element. The very high temperature and
direct heat of the grill make it possible to brown
meats on the surface while locking in the juices to
keep them tender.
! Never put objects directly on the bottom of the
oven; this will avoid the enamel coating being
damaged. Only use position 1 in the oven when
cooking with the rotisserie spit.
! Always place cookware on the rack(s) provided.
THERMOSTAT indicator light
When this is illuminated, the oven is generating
heat. It switches off when the inside of the oven
reaches the selected temperature. At this point the
light illuminates and switches off alternately,
indicating that the thermostat is working and is
maintaining the temperature at a constant level.
Oven light
This is switched on by turning the SELECTOR knob
to any position other than “0”. It remains lit as long
as the oven is operating. By selecting
with the
knob, the light is switched on without any of the
heating elements being activated.
Cooling ventilation*
In order to cool down the external temperature of the
oven, some models are fitted with a cooling fan that
blows out air between the control panel and the oven
door.
! Once the cooking has been completed, the cooling
fan remains on until the oven has cooled down
sufficiently.
Using the cooking timer
1. To set the buzzer, turn the COOKING TIMER knob
clockwise almost one complete revolution.
2. Turn the knob anticlockwise to set the desired
time: align the minutes shown on the COOKING
TIMER knob with the indicator on the control panel.
3. When the selected time has elapsed, a buzzer
sounds and the oven turns off.
4. When the oven is off the cooking timer can be
used as a normal timer.
! To use the oven manually, in other words when you
do not wish to use the end of cooking timer, turn the
COOKING TIMER knob until it reaches the 9
symbol.