


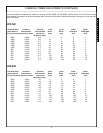

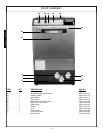
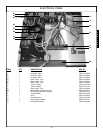
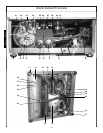

SHUTDOWN AND CLEANING: Remove the central knob (A) to
remove the wash arms. Check the nozzles to ensure they are not
clogged with debris. If they are, simply unscrew the nozzle retain-
er for the affected nozzle and remove it to clean out the debris.
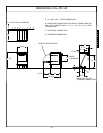
Flush the arms out with fresh water. IMPORTANT: Remove only
one nozzle at a time to ensure that you replace all of the nozzles
as required. Each of the wash nozzles are embossed with either
an S or a D. Use the diagrams to the right to refer to nozzle
placement. The are no differences in each of the rinse nozzles.
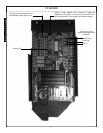
Remove the lower deflector washer (B) and clean. Notice how the
washer for the lower arm is installed with the lip up. This is very
important. If the deflector washer is not re-installed the same way,
wash performance will suffer tremendously. The upper deflector
washer (C) is only removable by removing the screws that attach
it to the top of the unit. In the event this reflector is removed to be
cleaned, make sure it is reattached with the lip facing downward
away from the top of the unit as shown in the picture below.
Remove the rear, left and right strainer supports and clean as
required. Remove the wash and drain strainers and clean them as
required. Wipe out the entire tub. Use a damp cloth to clean the
tank, never use abrasive material such as steel wool or a wire
brush to clean the tank. Use only cleaners specified for stainless
steel and always follow the manufacturer’s instructions on use of
the cleaner.
WARNING: Do not use substances containing chlorine or bleach
or anything containing hypochlorite compounds, as these chemi-
cals will damage the stainless steel surfaces, and in time will ren-
der the machine useless. Such damage is not covered by the war-
ranty.
OPERATION INSTRUCTIONS (CONTINUED)
6
A
B
C
Rinse Arms
(Thinner)
Wash Arms
(Thicker)
JPX-140
Wash/Rinse Arm
Assembly
Blank
Rinse Arms
Wash Arms
Blank
Blank
Rinse Arms
Wash Arms
Blank
D
S
D
S
JPX-160
Wash/Rinse Arm
Assembly
S D
S
D
JPX-200
Wash/Rinse Arm
Assembly
D
S
D S
I
N
S
T
R
U
C
T
I
O
N
S