


• A properly adjusted burner with clean ports will light
within a few seconds. If using natural gas, the flame
will be blue with a deeper blue inner cone.
• If the burner flame is yellow or is noisy, the air/gas
mixture may be incorrect. Contact a service
technician to adjust. (Adjustments are not covered by
the warranty.)
• With LP gas, some yellow tips on the flames are
acceptable. This is normal and adjustment is not
necessary.
• With some types of gas, you may hear a “popping”
sound when the surface burner is turned off. This is a
normal operating sound of the burner.
• To improve cooking efficiency and to prevent
possible damage to the cooktop or pan, the flame
must be adjusted so it does not extend beyond the
edge of the pan.
Important: Use care when lifting pans over the knobs to
prevent sliding the pan across the knob. This could cause
surface scratching of the knob.
To prevent the cooktop from discoloring or staining:
• Clean cooktop after each use.
• Wipe acidic or sugary spills as soon as the cooktop has
cooled as these spills may discolor the surface.
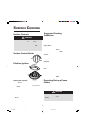
Cooktop at a Glance
Simmer Burner*
This burner is located in the center or left rear position. The
simmer burner offers a lower BTU flame for delicate
sauces or melting chocolate.
* BTU ratings will vary when using LP gas.
Burner Grates
The grates must be properly positioned before cooking. In
the proper position the grates should be flush and level
(see the graphic to the left). Improper installation of the
grates may result in chipping or scratching of the cooktop.
To ensure proper positioning, align bumpers on grate
bottom with the indentations in the cooktop.
Do not operate the burners without a pan on the
grate. The grate’s porcelain finish may chip without a
pan to absorb the heat from the burner flame.
Although the burner grates are durable, they will gradually
lose their shine and/or discolor, due to the high
temperatures of the gas flame.
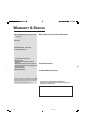
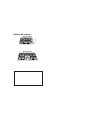
1. Left rear burner (5,000 BTUs 3. Left Front burner (12,000 BTUs).
on HIGH, 700 BTUs on LOW). 4. Right front burner (17,000 BTUs).
2. Right rear burner (9,200 BTUs).
Model JGC1430
1. Left front burner (9,200 BTUs). 4. Right rear burner (9,200 BTUs).
2. Left rear burner (12,000 BTUs). 5. Right front burner (17,000 BTUs).
3. Center burner (5,000 BTUs
on HIGH, 700 BTUs on LOW).
Model JGC1536
1
2
3
4
1 2 3 4 5
Sealed Burners
The sealed burners are secured to the cooktop and are not
designed to be removed. Since the burners are sealed into
the cooktop, boilovers or spills will not seep underneath
the cooktop.
However, the burners should be cleaned after each use.
The head portion of the burner has a removable cap that is
easily removed for cleaning. (See page 6 for cleaning
directions.)
Burner caps must be correctly placed on the burner base
for proper operation of the burner.
5
SURFACE COOKING
Notes:
High Performance Burner*
There is one high speed burner on your cooktop, located in
the right front position. This burner offers higher speed
cooking that can be used to quickly bring water to a boil
and for large-quantity cooking.
Wok
Use flat bottom wok accessory for
optimum results. Use caution when
removing wok from cooktop, handles
could be hot.
8111P498-60 8/25/06, 3:38 PM6