


8
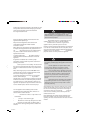
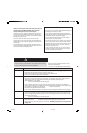
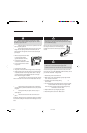
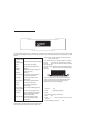
Leveling Legs
ANTI-TIP BRACKET
LEVELING LEG
Be sure the anti-tip bracket secures one of the rear
leveling legs to the floor. This bracket prevents the range
from accidentally tipping.
Be sure the range is leveled when installed. If
the range is not level, turn the leveling legs,
located at each corner of the range, until range
is level.
ANTI-TIP BRACKET
LEVELING LEG
CAUTION
To assure the proper replacement bulb is used, order bulb
from Jenn-Air. Call 1-800-JENNAIR (1-800-536-6247), ask for
part number 74004458 - halogen bulb.
To Replace Oven Light Bulb:
1. Disconnect power to the wall oven.
2. When oven is cool, use fingertips to grasp edge of bulb
cover. Pull out and remove.
3. Carefully remove old bulb by pulling straight out of
ceramic base.
4. To avoid damaging or decreasing the life of the new bulb,
do not touch the bulb with bare hands or fingers. Hold
with a dry cloth or paper towel. Push new bulb prongs
straight into small holes of ceramic base.
5. Replace bulb cover by snapping into place.
6. Reconnect power to the oven. Reset clock.
Oven Light
CAUTION
• Disconnect power to oven before replacing light bulb.
• Allow oven to cool before replacing light bulb.
• Make sure bulb cover and bulb are cool before touching.
MAINTENANCE
CAUTION
Oven Door
NEVER place excessive weight on or stand on an open
oven door. This could cause the range to tip over, break
the door, or injure the user.
• NEVER attempt to open or close door or operate oven until
door is properly replaced.
• NEVER place fingers between hinge and front oven frame.
Hinge arms are spring mounted. If accidentally hit, the
hinge will slam shut against oven frame and could injure
your fingers.
To remove:
1. When cool, open the oven door
to the broil stop position
(opened about four inches).
2. Grasp door at each side. Do not
use the door handle to lift door.
3. Lift up evenly until door clears
hinge arms.
To replace:
1. Grasp door at each side.
2. Align slots in the door with the hinge arms on the range.
3. Slide the door down onto the hinge arms until the door is
completely seated on the hinges. Push down on the top
corners of the door to completely seat door on hinges.
Door should not appear crooked.
Important: The oven door on a new range may feel “spongy”
when it is closed. This is normal and will decrease with use.
Oven Window
To protect the oven door window:
1. Do not use abrasive cleaning agents such as steel wool
scouring pads or powdered cleansers as they may scratch
the glass.
2. Do not hit the glass with pots, pans, furniture, toys, or
other objects.
3. Do not close the oven door until the oven racks are in
place.
Scratching, hitting, jarring or stressing the glass may weaken
its structure causing an increased risk of breakage at a later
date.
8113P626-60 5/3/06, 9:50 AM9