


OVEN COOKING
3
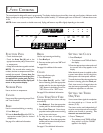
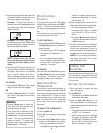
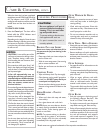
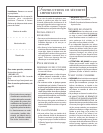
The control panel is designed for ease in programming. The display window shows time of day, timer and oven functions. Indicator words
flash to prompt your programming steps. In double ovens (select models), “U” indicates upper oven is ON and “L” indicates lower oven
is ON.
NOTE: Lower oven controls on double ovens only. Styling and features may differ slightly depending on the model.
B
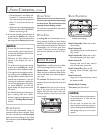
ROIL
Use for top browning and broiling.
1. Press Broil pad.
2. Press any number pad to set “Hi” broil
temperature.
See page 6 for additional information.
C
LEAN
Use to set self-clean cycle.
1. Press Clean pad.
2. Press Auto Set (0) pad for “3:00”
hours of cleaning, press the appropriate
number pads for the time desired after
“3:00” appears in the display. Press 2 for
“2:00” hours or 4 for “4:00” hours.
See page 8-9 for additional information.
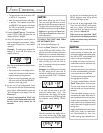
F
UNCTION
P
ADS
• Touch the desired pad.
• Touch the Auto Set (0) pad or the
appropriate number pad(s) to enter time
or temperature.
• A beep will sound when any pad is touched.
NOTE: Five seconds after entering the
number, the time or temperature will auto-
matically be entered. If more than five
seconds elapse between touching a func-
tion pad and the number pads, the func-
tion will be cancelled and the display will
return to the previous display.
N
UMBER
P
ADS
Use to set time or temperature.
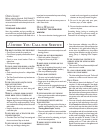
C
ANCEL
Use to cancel all programming except Clock
and Timer functions.
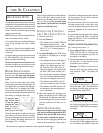
B
AKE
Use for conventional baking or roasting.
1. Press Bake pad.
2. Press the Auto Set (0) pad for 350° F or
appropriate number pads for desired
temperature.
See page 4 for additional information.
C
OOK
T
IME
/S
TOP
T
IME
Use to program the oven to start and stop
automatically.
1. Press Bake pad. Press the appropriate
number pads for desired temperature.
2. Press Cook Time pad. Press the ap-
propriate number pads to enter cooking
time in hours and minutes.
3. To delay the start of cooking, press
Stop Time pad. Press the appropriate
number pads to enter the time you want
the oven to stop.
See page 6-7 for additional information.
HR
DELAY
STOP
Convect
Roast
0
78
9
4
5
6
12
3
ProbeDrying
Auto Set
Convect
Bake
BroilBake Clean
Oven
Light
Cancel
BroilBake Clean
Oven
Light
Cancel
Clock
Stop
Time
Timer
One
Timer
Two
Cook
Time
Lock
START
TIMER
COOK
1 2
CONV
CLEAN
LOCK
BAKE
BROIL 2
PREHEAT
C
P
R
O
B
E
CONV
CLEAN
LOCK
BAKE
BROIL 2
PREHEAT
C
P
R
O
B
E
TIMED
U L OVEN
ROAST
STEAM
ON
ROAST
DRYING
ON
HR
DELAY
STOP
START
TIMER
COOK
1 2
CONV
CLEAN
LOCK
BAKE
BROIL 2
PREHEAT
C
P
R
O
B
E
CONV
CLEAN
LOCK
BAKE
BROIL 2
PREHEAT
C
P
R
O
B
E
TIMED
U L OVEN
ROAST
STEAM
ON
ROAST
DRYING
ON
HR
DELAY
STOP
START
TIMER
COOK
1 2
CONV
CLEAN
LOCK
BAKE
BROIL 2
PREHEAT
C
P
R
O
B
E
CONV
CLEAN
LOCK
BAKE
BROIL 2
PREHEAT
C
P
R
O
B
E
TIMED
U L OVEN
ROAST
STEAM
ON
ROAST
DRYING
ON
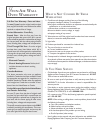
S
ETTING
THE
C
LOCK
1. Press Clock pad.
• The indicator word TIME will flash in
the display.
2. Press the appropriate number pads until
the correct time of day appears in the
display.
When electrical power is supplied or after
a power interruption, the last clock time,
before power was interrupted, will flash.
To recall the time of day when another time
function is showing, press the Clock pad.
Clock time cannot be changed when the
oven has been programmed for clock con-
trolled oven operations or self-clean.
S
ETTING
THE
T
IMER
O
NE
/T
WO
Use to set and then signal the completion
of a time period up to 11 hours and 55
minutes (11:55).
The timers can be used independently of
any other oven activity and can be set while
another oven function is operating. The
timers do not control the oven.
1. Press a Timer pad.
• The indicator word TIMER will flash
along with #1 or #2 plus “0HR:00”
appears in the display.