


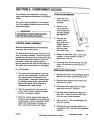


For JJW Models:
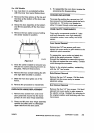
1. Lay oven door on a protected surface
with the inner door panel facing down.
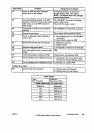
2. Remove the three screws at the top and
the three at the bottom of the door, see
Figure 2-2,
3. Grasp the door assembly at the bottom
and lift the assembly off the front door
glass.
4. Remove the two center screws holding
the center bracket in position.
Figure 2-2
5. Once the center bracket is removed you
will see two screws securing the trim to
the glass. Remove these screws.
6. Remove the two screws holding the left
and right side brackets inposition.
7. Slide the front door glass out of the
frame.
8. Reverse the procedure to reassemble.
OVEN DOOR HINGE REPLACEMENT
1. Remove two screws from oven inner
door panel that mount into the lower
portion of oven door hinge assembly.
2. Grasp and liftoven door hinge assembly
upward and slide down to disengage
upper tabs from the door panel.
3. To reassemble the oven door, reverse the
procedures for disassembling.
COOLING FAN ACCESS
To access the cooling fan, remove two 1/4"
hex screws from the bracket which the fan is
mounted on. Tilt motor and bracket to
allow it to pass through main back panel.
OVEN CAVITY COMPONENTS
Oven cavity components consist of: bake
and broil elements, oven light assembly,
convection motor, oven cavity, and oven
sensor,
Oven Sensor Removal
Remove two 1/4" hex screws, pull oven
sensor into oven cavity to gain access to the
electrical quick connector.
To reassemble, use a probe and attach the
probe to the quick connector, Guide it
through the insulation to ensure the connec-
tor does not contact the oven cavity. Contact
could damage the connector.
Return to the original position, reattaching
with the 1/4" hex screws.
Bake Element Removal
Remove the two 1/4" screws. Pull the bake
element into the oven cavity to access
electrical wiring.
Broil Element Removal
Remove the four 1/4" hex screws. Pull broil
element into oven cavity to gain access to
the electric wiring. Reattach by returning to
the original position and fastening with four
hex screws.
16009721 COMPONENT ACCESS 2-2
©1999 Maytag Appliances Sales Company