


20
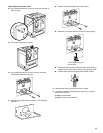
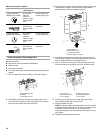
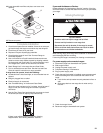
8. Check that the anti-tip bracket is installed and that electrical
cords are not kinked. Use a flashlight to look underneath the
bottom of the range.
■ Look for the anti-tip bracket securely attached to floor or
wall.
■ Slide range back so rear range foot is under anti-tip
bracket.
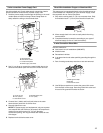
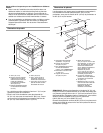
9. Level the range.
a.) Place rack in oven.
b.) Place level on rack and check levelness of the range, first
side to side; then front to back.
c.) If range is not level, pull range forward until rear leveling
leg is removed from the anti-tip bracket.
d.) Use a wrench or pliers to adjust leveling legs up or down
until range is level.
e.) Push range back into position.
f.) Check that rear leveling leg is engaged in anti-tip bracket.
NOTE: Range must be level for satisfactory baking performance.
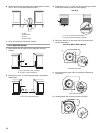
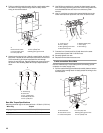
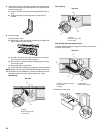
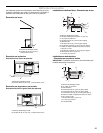
10. Depending on your installation, connect the flexible vent from
the blower motor inlet to the range using a vent clamp.
Wall Venting
Floor Venting
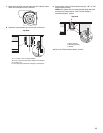
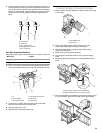
Side Venting (left side venting shown)
Connect flexible vent duct to range and connect vent system
to blower motor outlet.
11. Replace access panel.
Top View
A.Range
B.Wall venting outlet
C.Vent clamp
A
B
C
Top View
A.Range
B.Floor venting outlet
C.Vent clamp
Top View
A.Flexible vent duct to range
B.Vent clamp
C.Range
D.Vent system
E.Side venting outlet
C
A
B
B
E
C
A
D