


Flavored/Sugar Coated Beans: DO NOT fill these type beans
into the bean container. The sugars will stick to the burrs and
clog the flow of ground coffee. Have your local coffee store
grind these type beans and use as described in chapter 11.
Using Oily Beans: Beans with an oily surface tend to stick
together. This may prevent a continuous flow of beans from the
bean container into the burrs. As a result the grinder does not
grind enough coffee and you might get weak or no coffee at all.
Stir the beans in the bean container just before grinding.
Alternatively, you can also pour the beans in an open bowl and
let them sit for about 5 hours. The oils will evaporate (this will
not change the taste of your coffee). Then fill the beans into the
bean grinder. Now beans will feed into the burrs more easily.
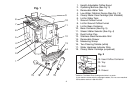
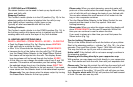
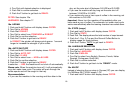
8. ADJUSTING THE GRINDER
You can adjust the grinder to the roast of your coffee.
We recommend the following:
Light roast: use a finer adjustment.
Dark roast: use a coarser adjustment.
• Open the lid of the bean container.
• While the grinder is running turn the grind selector switch to
the desired position (Fig. 6).
– The smaller the dots, the finer the grind.
– The bigger the dots, the coarser the grind.
Important: The grinding grade can only be adjusted while
the grinder is actually grinding.
9. DAILY PREPARATION
ON/OFF Button – HEATING – RINSE – READY
We recommend filling the water container every morning with
fresh, cold water. This will enhance the taste of your coffee.
• Push and hold On/Off button until the display turns on. If your
machine is cold the display shows
HEATING. After approx. 2
minutes the display shows RINSE.
• Press the Rinse Button (Fig. 3,f). Hot water will warm up all
internal parts and pump through the coffee spouts. The water
will be caught in the drawer underneath. The rinse cycle stops
by itself and the display reads:
READY You are now ready to
make coffee.
10. GRINDING AND BREWING
The Impressa E uses a 2-step brewing process (Pre-Brew Aroma
System). First it moistens the ground coffee (pre-brew phase),
pauses for a few seconds and then starts the brewing process.
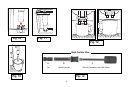
• Adjust the height of the coffee spout to your cup size (Fig. 12)
and place one or two cups underneath the coffee spouts.
HOTTER COFFEE? Pre-warm cup with hot water through frother.
See chapter 12 "Using Hot Water". Empty cup and brew coffee.
10a. SELECTING CUP SIZE AND STRENGTH
Cup Size 1 OZ. to 8 OZ; max: 16 oz.
• Push the Dial. It will illuminate and the display will show the
cup size in oz, e.g. 4 OZ.
• Turn the dial to select any cup size between
1 OZ. and 8 OZ.
Your machine will always remember the last setting. After 5
seconds the display will change back to
READY.
• When using the
2-Cup button the machine will automatically
double the selected amount of coffee.
Coffee Strength MILD – NORMAL - STRONG
Push the 1-Cup button once, the display shows: MILD,
twice:
NORMAL, three times: STRONG.
12.