


All Display Messages Are Shown in RED
5. FACTORY SETTINGS
Each machine leaves the factory with the following settings:
Filter ..................... – (not installed)
Hardness Level .... 2
Aroma ................... ROBUST
Temperature .......... HIGH
Time ...................... Not Set
Unit On ................. Not Set
Auto Off ................ 2 HRS
Cups Made ……… –
Language ............. English
Display ………………OZ and AM PM
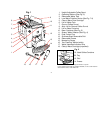
The Dial (Fig. 3a) is set to 4 OZ. for coffee and hot water and
60 SEC for steam.
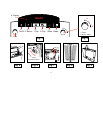
CUP ILLUMINATION (Fig. 12a)
The cup illumination adds a dramatic touch to brewing coffee.
Providing the machine is plugged in, you can activate the cup
illumination for 1 minute by pressing any button.
6. PREPARING THE MACHINE FOR THE FIRST TIME
• Make sure all accessories, literature and any other items are
removed from the machine and the water tank.
• Make sure the Clearyl Water Filter is NOT installed!
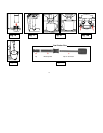
• Make sure the machine sits on an even, flat surface and the
drawer, tray and used coffee container are inserted (Fig 2).
• Plug-in machine.
• Turn the machine on by pressing the ON/OFF button (Fig. 3c).
The display shows FILL WATER. (If you have already filled the
water tank, the message OPEN TAP will be displayed).
• Remove water tank, fill with fresh, cold water and replace.
The display shows OPEN TAP.
The following procedure is only necessary when setting up the
machine for the first time and after the procedure "Emptying
System Before Transport" (chapter 19f).
• Place a cup underneath the frother (Fig. 13) and turn the
Steam/Water Selector to the Steam /Water symbol Fig. 4b).
SYSTEM FILLING. The machine will pump some water
through the frother and stop automatically. CLOSE TAP. Turn
the Steam/Water Selector back to the cup symbol. SYSTEM
FILLING. HEATING. PRESS RINSE. Place a cup underneath
the Coffee Spout (Fig. 12) and press the Rinse Button (Fig. 3g.)
The machine will pump a bit of hot water through the coffee
spouts and will stop automatically. READY. You can only
brew coffee when the display shows READY.
• Open the bean container lid (Fig. 1, 9) and fill with beans
(Fig. 5). For details see chapter 7.
• Place an empty cup (at least 8 oz.) under the coffee spouts.
• Push the Dial (Fig. 3a). The Dial illuminates and the display
shows the cup size 4 OZ.
• Push and hold the 1-Cup button until the display reads STRONG.
The F7 starts grinding and will start brewing.
Initially, the chamber may not fill properly with ground coffee.
The machine will start brewing, then interrupt and the display will
show FILL BEANS. Push the 1-Cup button again. Discard the
first 2 cups of coffee. Your next cup will be perfect.
Please note: If coffee only comes out of one spout, move the
11.