6
USK MGR 25959 - 080630
IMPORTANT INFORMATION
This appliance is not for professional use. You should follow the
requested breaks. Failure to follow this instruction carefully may result
in damage to the motor. Please refer to the rating label for the
maximum continuous usage time (KB xx min where xx is the maximum
usage time). The breaks should last at least 10 minutes.
BEFORE FIRST USE
It is necessary to clean all accessories (see paragraph "cleaning and
care") and to dry them.
ASSEMBLY OF THE ACCESSORIES AND OPERATION
Make sure the power cord is unplugged and the ON/OFF switch is in
OFF position before assembling the accessories. This instruction
should be observed each time you assemble or replace accessories.
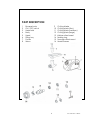
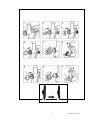
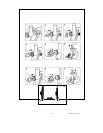
Unscrew the locking screw by turning it anti-clockwise and insert the
filling neck in the motor block.
Once the filling neck is positioned correctly, tighten the locking screw
by turning it clockwise (Fig. 1) and make sure it is tightly connected
to the motor block.
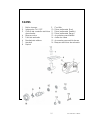
Put the worm on the motor shaft (Fig. 2) that you can see at the end
of the filling neck (to check if it is positioned correctly, it should not
be possible to turn it with the hand).
A) Discs
• These accessories allow mincing meat. According to the disc
you choose, you can obtain more or less finely minced meat.
• Place the blade upon the worm with its rounded side facing the
worm. (Fig. 3)
• Assemble one of the 3 discs upon the blade, making sure that its
two arresting pins lock precisely into the corresponding recesses.
(Fig. 4).
• Firmly screw on the sealing ring by turning it clockwise to tighten
the worm, blade and disc together. (Fig. 5). When screwing the
sealing ring, we advise you to press the disc to make sure that its
arresting pins stay in the right position.


