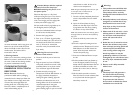
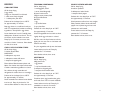
To lower the basket when frying, press the
button on top of the handle and press
down the handle so that it fits into the
handle recess.The basket will be
immersed in the oil.
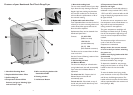
6.Viewing window
Allows you to check the cooking process.
Before use, smear a small amount of oil on
the inner surface of the viewing window
to prevent condensation forming.
COOKING WITH YOUR
KAMBROOK COOL TOUCH
DEEP FRYER
Before first use: Remove any
promotional labels and/or packaging
materials from the deep fryer.Wash the
fryer basket in warm soapy water, then
rinse and dry thoroughly.Wipe the
cooking bowl with a soft, damp cloth.
Ensure the bowl is completely free of
water before adding any oil.
Caution:Always add the required
amount of oil to the deep fryer
BEFORE switching the power on at
the power point.
Place the deep fryer on a dry, level
surface, ensuring the fryer is not close to
the edge of the benchtop and that the
cord is not hanging over the edge (refer
to safety instructions, page 2-3).
Pull the handle of the frying basket up to
the 90 degree position (see fig B).
1. Press the Lid Release Button and open
the lid to the vertical position.
2. Remove the frying basket.
3. Pour up to 1.75 litres of good quality
oil into the deep fryer. (The amount of
oil should not be below the minimum
mark (1.25 litres) or exceed the
maximum mark printed inside of the
fryer bowl).
Warning: Do not exceed the
maximum mark with oil.
4. Close the lid firmly into it locks into
position.
5. Plug the power cord into a 230/240
volt power outlet. Ensure cord is fully
extended. Switch on at power outlet.
The red ‘Power’ light will illuminate.
6. Preheat the oil by moving the
Temperature Control Slide Selector to
the right to desired temperature
setting.The green ‘Heating’ light will
illuminate to indicate that the oil is
heating.When the oil has reached the
required temperature, the green
‘Heating’ light will go out.Allow the
green ‘Heating’ light to cycle on and off
6 7
several times in order for the oil to
reach an even temperature.
NOTE:The green ‘Ready’ light will continue to cycle
on and off in order to maintain the set
temperature throughout cooking.
7. Once the oil has preheated, place food
into the fryer basket. Do not overfill
basket.
8. Open the lid and place the frying
basket into the deep fryer. Lower the
frying basket into the oil by pressing
the button on top of the handle.
NOTE: Care should be taken when lowering food in
the frying basket into the hot oil. Some splattering
may occur.
9. Close the lid firmly until it locks into
position.
10. Once the required cooking time has
ceased, move the Temperature Control
Slide Selector to the left. Switch the
power off at the power outlet and
remove the power plug.
11. Press the Lid Release Button to open
the lid.
12. Pull the handle of the fryer basket up
to the 90 degree position.The frying
basket will be suspended above the hot
oil.Allow the basket to stand in this
position for a short time to drain any
excess oil.
13. Lift the basket upwards to remove.
Place the food on a heat resistant plate
or tray lined with kitchen paper to
absorb any excess oil.
Warning:
1. This product must be filled with
oil to the correct marked level.
The product will be severely
damaged if heated without oil in
the bowl.
2. Solid oil products, such as butter,
margarine or animal fats of any
kind should not be used in the
deep fryer as they increase the
chance of fire hazard.
3. Water and oil do not mix – never
add any water or other liquid to
hot oil. Even small amounts of
water will cause the oil to
splatter.
4. Avoid the use of extension cords.
Serious hot oil burns may result
from a deep fryer being pulled off
a bench top. Do not allow the
cord to hang off the edge of a
bench top where it may be
grabbed by children, or become
entangled by the user. Never leave
the deep fryer unattended while
in use.
5. Ensure cord is fully extended
while in use.
Caution:
1. The deep fryer will generate a
lot of heat and steam during
and after the cooking process.
To prevent the risk of burns,
do not touch or block the steam
ventilation area on the lid.
Fig A.
Fig B.