


Setting Oven Controls
Broil
Use the Broil feature to cook meats that require direct
exposure to flame heat for optimum browning. Use the
broiler drawer and rack along with the broil pan and
insert when broiling. The broiler drawer offers 3 different
broil rack positions.
DO NOT use oven or broiler drawer for
storage. Items placed in oven or broiler drawer will catch
fire.
Should an oven fire occur, close the door
and drawer and turn the oven OFF. If the fire continues,
use a fire extinguisher. DO NOT put water or flour on the
fire. Flour may be explosive.
Always use oven miffs when using the
oven or broiler drawer. When cooking, the oven, cooktop,
broiler drawer and racks will become very hot which can
cause burns.
The broil pan and insert allows grease to
drain and be kept away from high heat of the broiler. DO
NOT use broil pan without insert. DO NOT cover insert with
aluminum fail; the exposed grease could ignite.
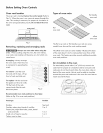
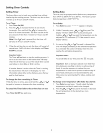
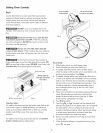
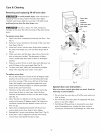
Broil
Broil pan insert
/
Always pick up
broil pan and insert
from sides
Broiler drawer rack Fig. 1
Important notes:
For medium doneness, position the broiler rack close to the
oven burner (upper or middle positions). For well-done
foods such as chicken, lobster tails or thick cuts of meat,
position rack further away from oven burner (lower
position).
For optimum browning, close broiler drawer and preheat
broiler 5 mlnufes before adding food.
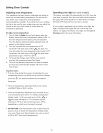
3 rear locating
hole positions
tilt up front of rack
to remove and adjust
Fig. 2
Fig. 3
To set broih
1. Slide broiler drawer out until drawer stops.
2. Remove broiler pan and insert (See Fig. 1).
3. If needed, reposition broiler rack in broiler drawer
while the range is still cool. Be sure to read broiler rack
position recommendations (See Notes).
4. If needed, change broiler rack position by tilting front
of rack up & pulling rack completely out from locating
holes in rear of broiler drawer (See Fig. 2). Reposition
back of rack in one of 3 locating holes and allow front
of rack to slide down into the corresponding slots in
front of broiler drawer (Fig. 3). Be sure rack is level
before broiling.
5. Place insert on broiler pan and place prepared food on
insert. Place broiler pan and insert with food into
broiler on drawer rack as shown (See Fig. 1). Slide
broiler drawer completely into range.
6. Press Broil key pad.
7. Press the A or V key pad until the desired broil
setting level appears in the display, nor is for normal, hi
for high and la is for low setting. Most foods can be
broiled at the hi broil setting. Select the la broil setting
to avoid excess browning or drying of foods that
should be broiled to the well-done stage.
8. Broil on one side until food is browned; turn and broil
on other side.
9. When finished broiling or to cancel broil at any time
press STOPkey pad.
12