


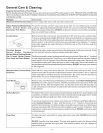

General Care & Cleaning (cont'd)
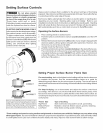
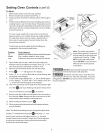
To Raise and Lower the Top for Cleaning
1. Remove burner grates and spillover bowls. Set aside.
2. Grasp the sides of the cooktop and then lift from the front.
3. Lift the top high enough to allow the support rods to snap into place. The Lift=up rods
will support the top in its raised position.
4. Clean underneath using hot, soapy water and a clean cloth; then, dry.
5. To lower the range top, grasp the front corner of each side of the top while pushing back
on each rod with the heel of your hand. This will release the notched support. Hold the
range top and gently slide the range top down to the range.
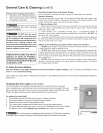
Removing and Replacing Burners for Cleaning
To Remove Burners
1. Remove shipping screws with a Phillips Head screwdriver. See illustration for screw
locations.
2. Tilt the burner at the end closest to the support bar until the Iocator tab is released (front
burners tilt right, rear burners tilt left). Move the burner toward the back of the range.
This will separate it from the gas valve at the front of the range.
To Replace Burners
1. Slide the burner tube over the gas valve at the front of the range (front burners fit over
the right valve, rear burners fit over the left valve on each side of the range).
2. Tilt burner so that the locating tab will slide into the slot on the support bar. Make sure
burners are properly seated on support bar and are level.
3. Replace shipping screws if desired.
DO NOT turn the burners on when the cooktop is raised for cleaning. Be sure
that the top iscompletely lowered and securely in place before turning on the burners.
When lowering the top,
grasp the sides with fingertips only.
Be careful not to pinch fingers. Also,
DO NOT drop or bend the rangetop
when raising or lowering. This could
Main Top
Support
Bar
i 0¢
or
use
a Nail
Fig. 2
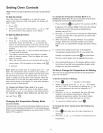
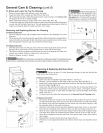
about 45
Oven Door
Hinge
Fig. 3
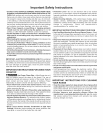
Removing & Replacing the Oven Door
The door is heavy. For safe, temporary storage, lay the door flat with the
inside of the door facing down.
To Remove Oven Door:
1. Open oven door completely (horizontal with floor - See Fig. 1).
2. Remove 2 screws located on the inside of the oven door liner (See A Fig. 2)
3. Insert the 2 screws into the door hinge holes located on the side of the hinge arm, one
into each hinge (See B Fig. 2).
4. Close oven door until the door stops, (Do not force the door to close any further). The
placement of these screws should keep door open in about a 45 degree position.
5. Grasp oven door firmly on both sides and slide door up and off hinges at the same
angle. (See Fig. 3)
6. To clean oven door, follow the instructions in the General Care & Cleaning table.
To Replace Oven Door:
1. Be sure the hinge arms remain at the 45 degree angle position. Be sure the screws
are still locking the hinge arms from moving. If the screws fall out of the hinge holes,
the hinge(s) may snap back against the oven frame and could pinch fingers or chip
the porcelain finish on the oven front frame.
2. Hold door at the sides near the top while resting the lower front of door on your knee.
Insert the door channels at the bottom of door over the door hinges, (See Fig. 3).
3. Allow the door to slide down into the door hinges evenly at the same 45 degree angle.
The hinge arms should be inserted into the bottom corners as far as they can go.
4. Open door completely (horizontal with floor) and remove both screws from holes in
door hinges.
5. Reinstall the 2 screws into the door liner (See C Fig. 2).
6. If the door is not in alignment with the oven frame, remove door and repeat the above
steps.
13